
![Caddy]() Caddy
Caddy
Container
Open-source web server with automatic HTTPS written in Go
Image details
Configuration
TypeContainerlinuxcaddy:latest80/tcp/dataTemplate by portainer
Report issueStandalone Install
Select an install method, to see config/commands for deploying Caddy
Install on Portainer
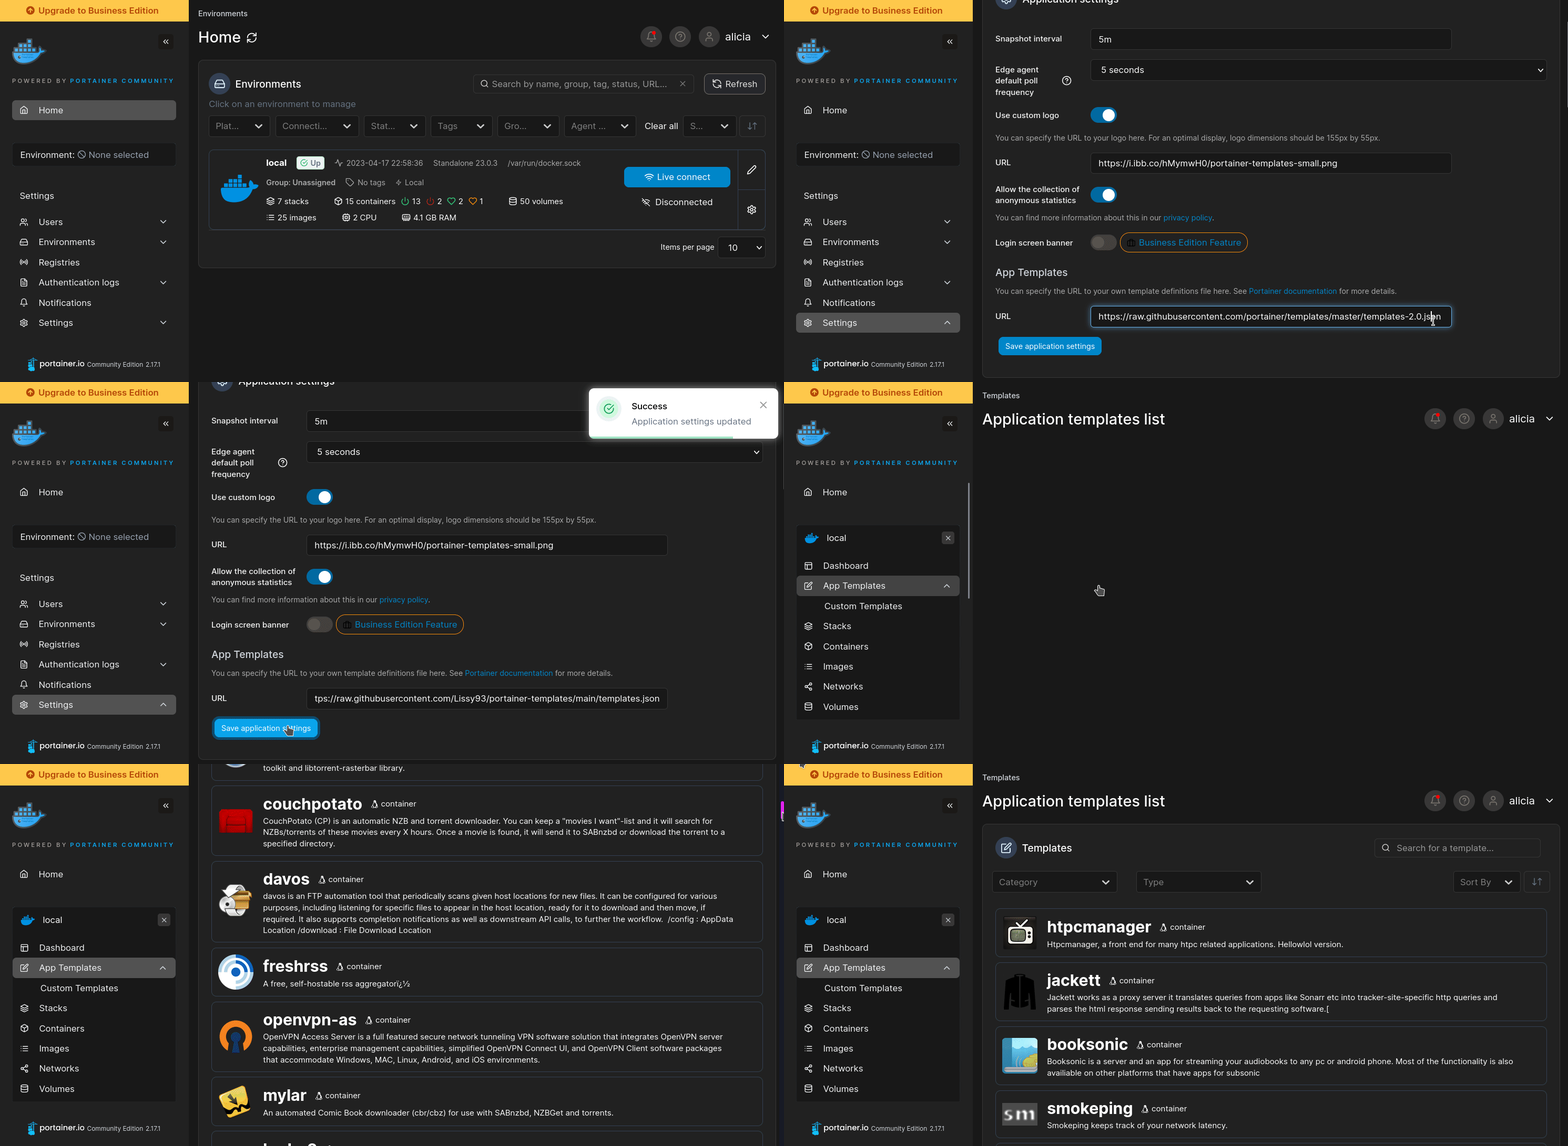
Import all app templates into your Portainer instance, for easy 1-click deploys
- Ensure both Docker and Portainer are installed, and up-to-date
- Log into your Portainer web UI
- Under Settings → App Templates, paste the below URL
- Head to Home → App Templates, and the list of apps will show up
- Select Caddy, fill in any config options, and hit Deploy
Template Import URL
https://raw.githubusercontent.com/Lissy93/portainer-templates/main/templates.json
Show Me
More install options in our documentation.
Quick reference
- Maintained by:
[the Caddy Docker Maintainers](https://github.com/caddyserver/caddy-docker)- Where to get help:
[the Caddy Community Forums](https://caddy.community)Supported tags and respective Dockerfile links
(See "What's the difference between 'Shared' and 'Simple' tags?" in the FAQ.)Simple Tags
Shared Tags
2.11.4,2.11,2,latest:
-	[`2.11.4-alpine`](https://github.com/caddyserver/caddy-docker/blob/fba2853501d36e8a72f946ac8cb7ff64d07e48f2/2.11/alpine/Dockerfile)
-	[`2.11.4-windowsservercore-ltsc2022`](https://github.com/caddyserver/caddy-docker/blob/fba2853501d36e8a72f946ac8cb7ff64d07e48f2/2.11/windows/ltsc2022/Dockerfile)
- [`2.11.4-windowsservercore-ltsc2025`](https://github.com/caddyserver/caddy-docker/blob/fba2853501d36e8a72f946ac8cb7ff64d07e48f2/2.11/windows/ltsc2025/Dockerfile)2.11.4-builder,2.11-builder,2-builder,builder:
-	[`2.11.4-builder-alpine`](https://github.com/caddyserver/caddy-docker/blob/fba2853501d36e8a72f946ac8cb7ff64d07e48f2/2.11/builder/Dockerfile)
-	[`2.11.4-builder-windowsservercore-ltsc2022`](https://github.com/caddyserver/caddy-docker/blob/fba2853501d36e8a72f946ac8cb7ff64d07e48f2/2.11/windows-builder/ltsc2022/Dockerfile)
- [`2.11.4-builder-windowsservercore-ltsc2025`](https://github.com/caddyserver/caddy-docker/blob/fba2853501d36e8a72f946ac8cb7ff64d07e48f2/2.11/windows-builder/ltsc2025/Dockerfile)2.11.4-windowsservercore,2.11-windowsservercore,2-windowsservercore,windowsservercore:
-	[`2.11.4-windowsservercore-ltsc2022`](https://github.com/caddyserver/caddy-docker/blob/fba2853501d36e8a72f946ac8cb7ff64d07e48f2/2.11/windows/ltsc2022/Dockerfile)
- [`2.11.4-windowsservercore-ltsc2025`](https://github.com/caddyserver/caddy-docker/blob/fba2853501d36e8a72f946ac8cb7ff64d07e48f2/2.11/windows/ltsc2025/Dockerfile)2.11.4-nanoserver,2.11-nanoserver,2-nanoserver,nanoserver:
-	[`2.11.4-nanoserver-ltsc2022`](https://github.com/caddyserver/caddy-docker/blob/fba2853501d36e8a72f946ac8cb7ff64d07e48f2/2.11/windows-nanoserver/ltsc2022/Dockerfile)
-	[`2.11.4-nanoserver-ltsc2025`](https://github.com/caddyserver/caddy-docker/blob/fba2853501d36e8a72f946ac8cb7ff64d07e48f2/2.11/windows-nanoserver/ltsc2025/Dockerfile)
Quick reference (cont.)
- Where to file issues:
[https://github.com/caddyserver/caddy-docker/issues](https://github.com/caddyserver/caddy-docker/issues?q=is:issue+is:pr)- Supported architectures: (more info)
[`amd64`](https://hub.docker.com/r/amd64/caddy/), [`arm32v6`](https://hub.docker.com/r/arm32v6/caddy/), [`arm32v7`](https://hub.docker.com/r/arm32v7/caddy/), [`arm64v8`](https://hub.docker.com/r/arm64v8/caddy/), [`ppc64le`](https://hub.docker.com/r/ppc64le/caddy/), [`riscv64`](https://hub.docker.com/r/riscv64/caddy/), [`s390x`](https://hub.docker.com/r/s390x/caddy/), [`windows-amd64`](https://hub.docker.com/r/winamd64/caddy/)- Published image artifact details:
[repo-info repo's `repos/caddy/` directory](https://github.com/docker-library/repo-info/blob/master/repos/caddy) ([history](https://github.com/docker-library/repo-info/commits/master/repos/caddy))
(image metadata, transfer size, etc)- Image updates:
[official-images repo's `library/caddy` label](https://github.com/docker-library/official-images/issues?q=label%3Alibrary%2Fcaddy)
[official-images repo's `library/caddy` file](https://github.com/docker-library/official-images/blob/master/library/caddy) ([history](https://github.com/docker-library/official-images/commits/master/library/caddy))- Source of this description:
[docs repo's `caddy/` directory](https://github.com/docker-library/docs/tree/master/caddy) ([history](https://github.com/docker-library/docs/commits/master/caddy))
What is Caddy?
Caddy 2 is a powerful, enterprise-ready, open source web server with automatic HTTPS written in Go.How to use this image
⚠️ A note about persisted data
Caddy requires write access to two locations: a data directory, and a configuration directory. While it's not necessary to persist the files stored in the configuration directory, it can be convenient. However, it's very important to persist the data directory.From the docs:
The data directory must not be treated as a cache. Its contents are not ephemeral or merely for the sake of performance. Caddy stores TLS certificates, private keys, OCSP staples, and other necessary information to the data directory. It should not be purged without an understanding of the implications.
This image provides for two mount-points for volumes:
/data and /config.In the examples below, a named volume
caddy_data is mounted to /data, so that data will be persisted.Note that named volumes are persisted across container restarts and terminations, so if you move to a new image version, the same data and config directories can be re-used.
Basic Usage
The default config file simply serves files from/usr/share/caddy, so if you want to serve index.html from the current working directory:$ echo "hello world" > index.html
$ docker run -d -p 80:80 \
-v $PWD/index.html:/usr/share/caddy/index.html \
-v caddy_data:/data \
caddy
...
$ curl http://localhost/
hello worldTo override the default
Caddyfile, you can create one in the subfolder conf at $PWD/conf/Caddyfile and mount this folder at /etc/caddy:$ docker run -d -p 80:80 \
-v $PWD/conf:/etc/caddy \
-v caddy_data:/data \
caddy⚠️ Do not mount the Caddyfile directly at /etc/caddy/Caddyfile
If vim or another editor is used that changes the inode of the edited file, the changes will only be applied within the container when the container is recreated, which is explained in detail in this Medium article. When using such an editor, Caddy's graceful reload functionality might not work as expected, as described in this issue.Automatic TLS with the Caddy image
The defaultCaddyfile only listens to port 80, and does not set up automatic TLS. However, if you have a domain name for your site, and its A/AAAA DNS records are properly pointed to this machine's public IP, then you can use this command to simply serve a site over HTTPS:$ docker run -d --cap-add=NET_ADMIN -p 80:80 -p 443:443 -p 443:443/udp \
-v /site:/srv \
-v caddy_data:/data \
-v caddy_config:/config \
caddy caddy file-server --domain example.comThe key here is that Caddy is able to listen to ports
80 and 443, both required for the ACME HTTP challenge.See Caddy's docs for more information on automatic HTTPS support!
Building your own Caddy-based image
Most users deploying production sites will not want to rely on mounting files into a container, but will instead base their own images oncaddy:# note: never use the :latest tag in a production site
FROM caddy:<version>
COPY Caddyfile /etc/caddy/Caddyfile
COPY site /srvAdding custom Caddy modules
Caddy is extendable through the use of "modules". See https://caddyserver.com/docs/extending-caddy for full details. You can find a list of available modules on the Caddy website's download page.You can use the
:builder image as a short-cut to building a new Caddy binary:FROM caddy:<version>-builder AS builder
RUN xcaddy build \
--with github.com/caddyserver/nginx-adapter \
--with github.com/hairyhenderson/caddy-teapot-module@v0.0.3-0
FROM caddy:<version>
COPY --from=builder /usr/bin/caddy /usr/bin/caddyNote the second
FROM instruction - this produces a much smaller image by simply overlaying the newly-built binary on top of the regular caddy image.The
xcaddy tool is used to build a new Caddy entrypoint, with the provided modules. You can specify just a module name, or a name with a version (separated by @). You can also specify a specific version (can be a version tag or commit hash) of Caddy to build from. Read more about xcaddy usage.Note that the "standard" Caddy modules (
github.com/caddyserver/caddy/master/modules/standard) are always included.Graceful reloads
Caddy does not require a full restart when configuration is changed. Caddy comes with acaddy reload command which can be used to reload its configuration with zero downtime.When running Caddy in Docker, the recommended way to trigger a config reload is by executing the
caddy reload command in the running container.First, you'll need to determine your container ID or name. Then, pass the container ID to
docker exec. The working directory is set to /etc/caddy so Caddy can find your Caddyfile without additional arguments.$ caddy_container_id=$(docker ps | grep caddy | awk '{print $1;}')
$ docker exec -w /etc/caddy $caddy_container_id caddy reloadLinux capabilities
Caddy ships with HTTP/3 support enabled by default. To improve the performance of this UDP based protocol, the underlying quic-go library tries to increase the buffer sizes for its socket. TheNET_ADMIN capability allows it to override the low default limits of the operating system without having to change kernel parameters via sysctl.Giving the container this capability is optional and has potential, though unlikely, to have security implications.
See https://github.com/quic-go/quic-go/wiki/UDP-Buffer-Sizes for more details.
Docker Compose example
If you prefer to usedocker compose to run your stack, here's a sample service definition which goes in a file named compose.yaml. The configuration assumes you put a custom Caddyfile into $PWD/conf as described above.services:
caddy:
image: caddy:<version>
restart: unless-stopped
cap_add:
- NET_ADMIN
ports:
- "80:80"
- "443:443"
- "443:443/udp"
volumes:
- $PWD/conf:/etc/caddy
- $PWD/site:/srv
- caddy_data:/data
- caddy_config:/config
volumes:
caddy_data:
caddy_config:Graceful reloads can then be conducted via
docker compose exec -w /etc/caddy caddy caddy reload.Image Variants
Thecaddy images come in many flavors, each designed for a specific use case.caddy:<version>
This is the defacto image. If you are unsure about what your needs are, you probably want to use this one. It is designed to be used both as a throw away container (mount your source code and start the container to start your app), as well as the base to build other images off of.caddy:<version>-alpine
This image is based on the popular Alpine Linux project, available in the alpine official image. Alpine Linux is much smaller than most distribution base images (~5MB), and thus leads to much slimmer images in general.This variant is useful when final image size being as small as possible is your primary concern. The main caveat to note is that it does use musl libc instead of glibc and friends, so software will often run into issues depending on the depth of their libc requirements/assumptions. See this Hacker News comment thread for more discussion of the issues that might arise and some pro/con comparisons of using Alpine-based images.
To minimize image size, it's uncommon for additional related tools (such as
git or bash) to be included in Alpine-based images. Using this image as a base, add the things you need in your own Dockerfile (see the alpine image description for examples of how to install packages if you are unfamiliar).caddy:<version>-windowsservercore
This image is based on Windows Server Core (mcr.microsoft.com/windows/servercore). As such, it only works in places which that image does, such as Windows 10 Professional/Enterprise (Anniversary Edition) or Windows Server 2016.For information about how to get Docker running on Windows, please see the relevant "Quick Start" guide provided by Microsoft:
License
View license information for the software contained in this image.As with all Docker images, these likely also contain other software which may be under other licenses (such as Bash, etc from the base distribution, along with any direct or indirect dependencies of the primary software being contained).
Some additional license information which was able to be auto-detected might be found in the
repo-info repository's caddy/ directory.As for any pre-built image usage, it is the image user's responsibility to ensure that any use of this image complies with any relevant licenses for all software contained within.
Serve Caddy on your own domain behind Caddy, Nginx or Traefik. Fill in your domain and copy the result. It's a starting point, some apps need their own base URL or extra headers set too.
Proxying caddy.example.com to http://caddy:80
Add this to your Caddyfile
caddy.example.com {
	reverse_proxy http://caddy:80
}Check the logs first
Nine times out of ten the logs tell you exactly what went wrong.
- In Portainer, go to Containers, click the container, then Logs. Or run
docker logs <container> - Exit codes help too:
137means killed, usually out of memory.126or127means the command inside the image is broken.
Published on a random port
This template exposes 80/tcp without setting a host port,
so Docker picks a random free one on every deploy.
- Find it in the Ports column of Portainer's container list, or with
docker port <container>
Image won't pull
Test the pull directly on the host: docker pull caddy:latest
- "manifest unknown" means the tag no longer exists. This template uses
latest, so try pinning a specific version instead. - "toomanyrequests" is the Docker Hub rate limit. Log in with
docker loginto raise it. - "no space left on device" means a full disk. Reclaim space with
docker system prune
"exec format error"
This means the image was built for a different CPU architecture than your server.
- This image supports:
amd64, arm/v7, arm/v6, ppc64le, s390x, riscv64, arm64/v8 - Check yours with
uname -m: x86_64 is amd64, aarch64 is arm64. Raspberry Pi and other ARM boards are the usual culprits.
Raise an issue
Found something which isn't working as it should? Here's how to report it.
- Bug within the app: Open an issue within the app's repo
- Template not working: Open an issue on portainer/templates
- This website not working: Open an issue on lissy93/portainer-templates
A single container
Caddy runs as one container, the simplest kind of app here. Just the one image to pull and nothing else wired up alongside it.
The app image
An image is the app packed up ready to go, everything Caddy needs bundled into one download. This template pulls caddy:latest, which Docker fetches once (about 76 MB) and then starts your own copy from.
Where the image comes from
Docker pulls its images from registries, public libraries of ready-built apps. Caddy's comes from Docker Hub as one of its official, curated images.
Version tags
The bit after the colon in the image name is the version tag. Here it's latest, which always points at the newest build, so a redeploy can bump you to a newer release without you asking. Newest right now is 2.11.4-builder-alpine. Pin a specific tag if you would rather stay on one version.
Which machines it runs on
Every image is built for particular CPU types. This one ships for amd64, arm/v7, arm/v6, ppc64le, s390x, riscv64, arm64/v8, so it runs on both regular x86 servers and ARM boards like a Raspberry Pi.
Ports
A port is the door the app answers on. Here the app exposes a port but leaves the host side blank, so Docker picks a free one for you. It opens:
80, published on a random host port
Volumes
A volume is where Caddy keeps its files so they survive an update or a restart. Without one, anything it saves would sit inside the container and vanish the moment it's recreated. This template mounts:
/dataas a volume Docker manages for you
Networking
Nothing custom is set, so Caddy sits on Docker's default bridge network: its own private space that reaches the outside world only through the ports it publishes.
Platform
The platform is linux, the kind of system the container is built to run on. Docker and Portainer handle this on a normal Linux server.
Portainer app templates
Zooming out, this whole page comes from a Portainer app template: a short recipe telling Portainer how to set Caddy up. Add the template list to Portainer once, then deploying Caddy is a click rather than a wall of config.