
![Jellyfin (stack)]() Jellyfin (stack)
Jellyfin (stack)
Jellyfin - the free, self-hosted media server: stream your movies, TV shows, music, and photos to any device through a web UI and native apps (Android, iOS, Android TV, Roku, Kodi, and more).
Source: https://github.com/jellyfin/jellyfin
Source details
Configuration
TypeComposelinux5000:5000/config : config/cache : cache/media : mediaJELLYFIN_PublishedServerUrl=${PUBLISHED_SERVER_URL:-http://localhost:5000}PUBLISHED_SERVER_URL=http://localhost:5000unless-stopped.Template by deployable-sh·Source
Report issueInstall on Portainer
Import all app templates into your Portainer instance, for easy 1-click deploys
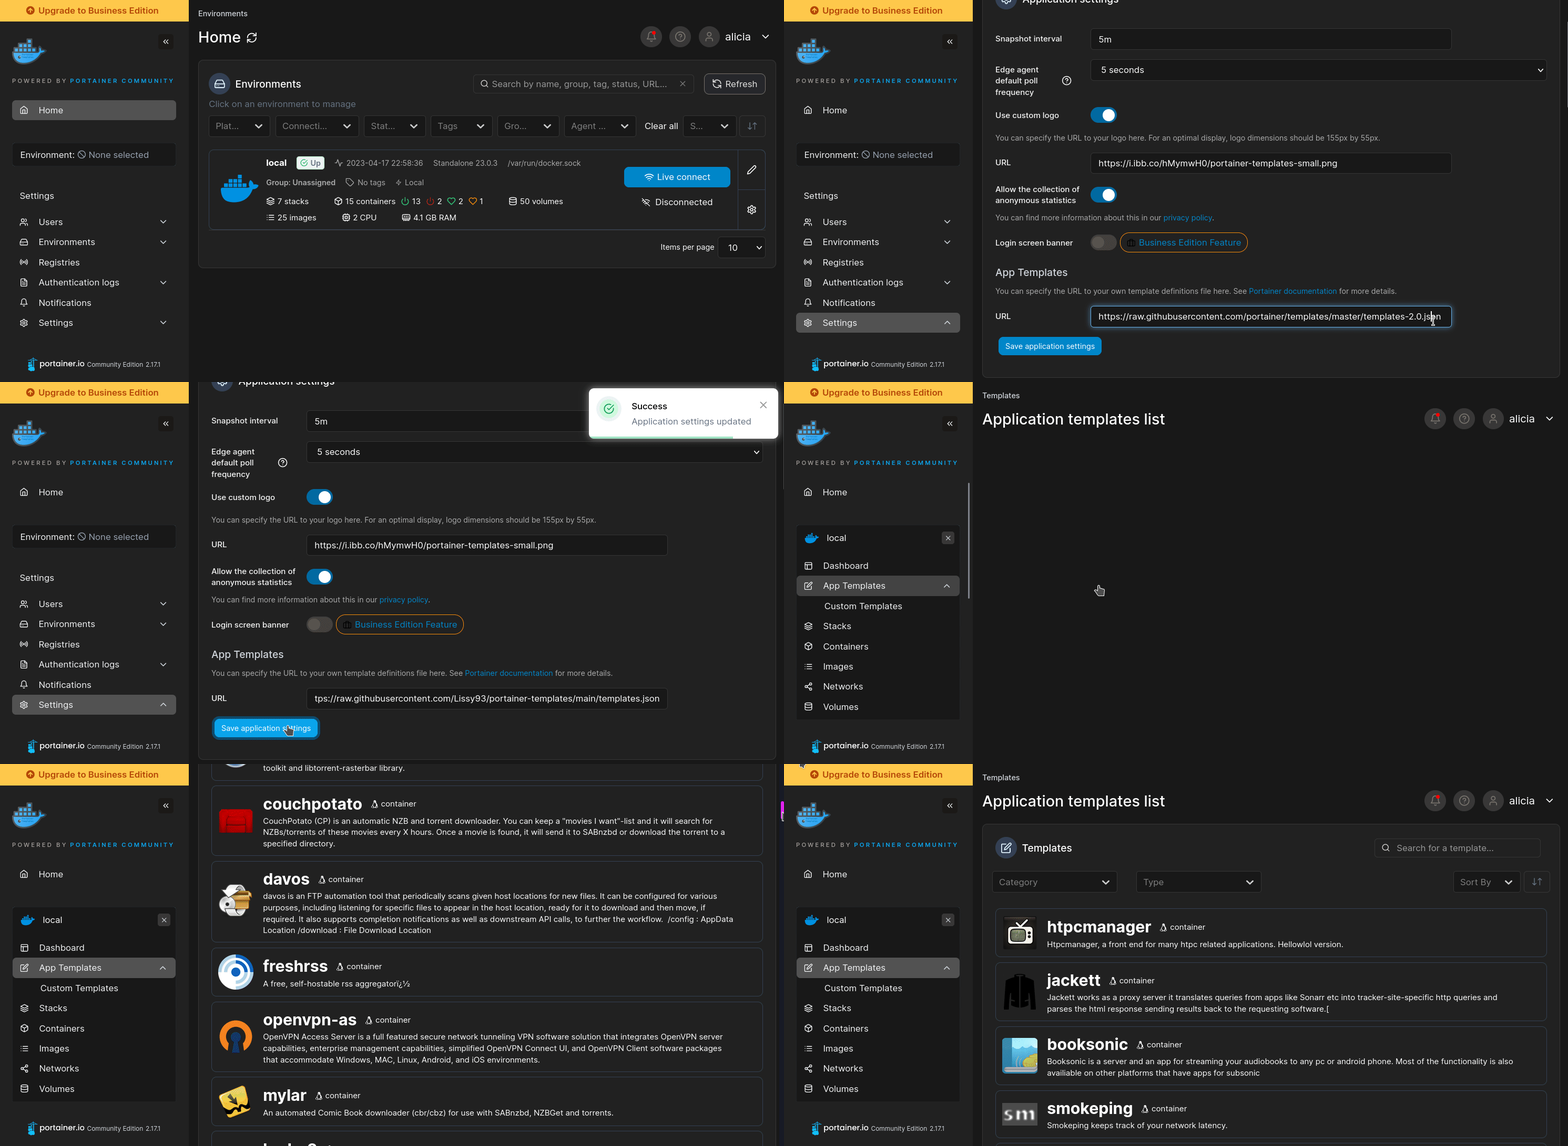
- Ensure both Docker and Portainer are installed, and up-to-date
- Log into your Portainer web UI
- Under Settings → App Templates, paste the below URL
- Head to Home → App Templates, and the list of apps will show up
- Select Jellyfin (stack), fill in any config options, and hit Deploy
Template Import URL
https://raw.githubusercontent.com/Lissy93/portainer-templates/main/templates.json
Show Me
Original stackfile
The compose file this template deploys, straight from its repo:
name: jellyfin

services:
  jellyfin:
    build: .
    restart: unless-stopped
    environment:
      JELLYFIN_PublishedServerUrl: ${PUBLISHED_SERVER_URL:-http://localhost:5000}
    ports:
      - "5000:5000"
    volumes:
      - config:/config
      - cache:/cache
      - media:/media

volumes:
  config:
  cache:
  media:
Or deploy it directly from the source:
git clone https://github.com/deployable-sh/stacks
cd stacks
docker compose -f jellyfin/compose.yaml up -d
More install options in our documentation, or see jellyfin/jellyfin for app-specific guidance.
Jellyfin
The Free Software Media System










Jellyfin is a Free Software Media System that puts you in control of managing and streaming your media. It is an alternative to the proprietary Emby and Plex, to provide media from a dedicated server to end-user devices via multiple apps. Jellyfin is descended from Emby's 3.5.2 release and ported to the .NET platform to enable full cross-platform support.
There are no strings attached, no premium licenses or features, and no hidden agendas: just a team that wants to build something better and work together to achieve it. We welcome anyone who is interested in joining us in our quest!
For further details, please see our documentation page. To receive the latest updates, get help with Jellyfin, and join the community, please visit one of our communication channels. For more information about the project, please see our about page.
Want to get started?
Check out our downloads page or our installation guide, then see our quick start guide. You can also build from source.
Something not working right?
Open an Issue on GitHub.
Want to contribute?
Check out our contributing choose-your-own-adventure to see where you can help, then see our contributing guide and our community standards.
New idea or improvement?
Check out our feature request hub.
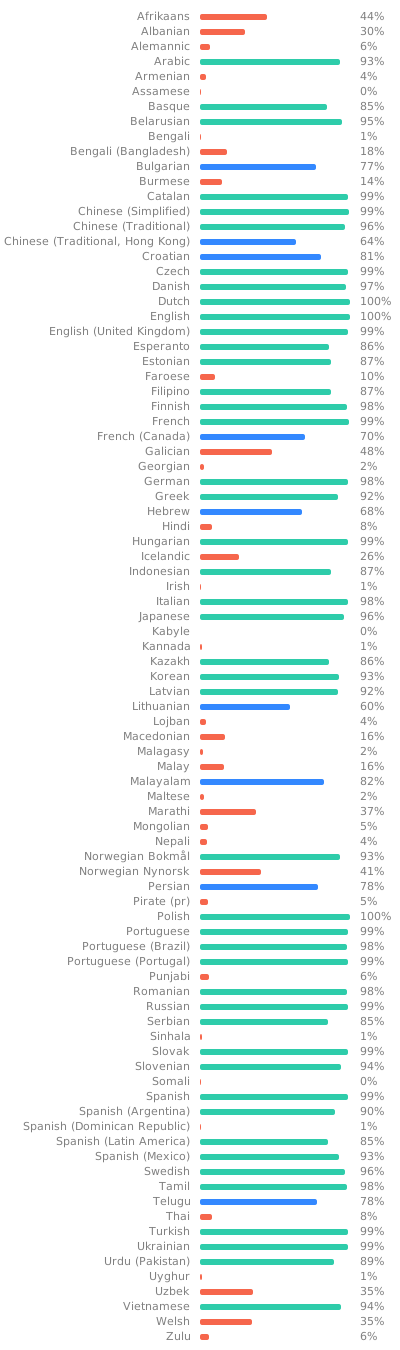
Don't see Jellyfin in your language?
Check out our Weblate instance to help translate Jellyfin and its subprojects.
Jellyfin Server
This repository contains the code for Jellyfin's backend server. Note that this is only one of many projects under the Jellyfin GitHub organization on GitHub. If you want to contribute, you can start by checking out our documentation to see what to work on.Server Development
These instructions will help you get set up with a local development environment in order to contribute to this repository. Before you start, please be sure to completely read our guidelines on development contributions. Note that this project is supported on all major operating systems except FreeBSD, which is still incompatible.Prerequisites
Before the project can be built, you must first install the .NET 10 SDK on your system.Instructions to run this project from the command line are included here, but you will also need to install an IDE if you want to debug the server while it is running. Any IDE that supports .NET 6 development will work, but two options are recent versions of Visual Studio (at least 2022) and Visual Studio Code.
ffmpeg will also need to be installed.
Cloning the Repository
After dependencies have been installed you will need to clone a local copy of this repository. If you just want to run the server from source you can clone this repository directly, but if you are intending to contribute code changes to the project, you should set up your own fork of the repository. The following example shows how you can clone the repository directly over HTTPS.git clone https://github.com/jellyfin/jellyfin.gitInstalling the Web Client
The server is configured to host the static files required for the web client in addition to serving the backend by default. Before you can run the server, you will need to get a copy of the web client since they are not included in this repository directly.Note that it is recommended for development to host the web client separately from the web server with some additional configuration, in which case you can skip this step.
There are two options to get the files for the web client.
- Build them from source following the instructions on the jellyfin-web repository
- Get the pre-built files from an existing installation of the server. For example, with a Windows server installation the client files are located at
C:\Program Files\Jellyfin\Server\jellyfin-web
Running The Server
The following instructions will help you get the project up and running via the command line, or your preferred IDE.Running With Visual Studio
To run the project with Visual Studio you can open the Solution (.sln) file and then press F5 to run the server.Running With Visual Studio Code
To run the project with Visual Studio Code you will first need to open the repository directory with Visual Studio Code using theOpen Folder... option.Second, you need to install the recommended extensions for the workspace. Note that extension recommendations are classified as either "Workspace Recommendations" or "Other Recommendations", but only the "Workspace Recommendations" are required.
After the required extensions are installed, you can run the server by pressing
F5.Running From the Command Line
To run the server from the command line you can use thedotnet run command. The example below shows how to do this if you have cloned the repository into a directory named jellyfin (the default directory name) and should work on all operating systems.cd jellyfin # Move into the repository directory
dotnet run --project Jellyfin.Server --webdir /absolute/path/to/jellyfin-web/dist # Run the server startup projectA second option is to build the project and then run the resulting executable file directly. When running the executable directly you can easily add command line options. Add the
--help flag to list details on all the supported command line options.- Build the project
dotnet build                       # Build the project
cd Jellyfin.Server/bin/Debug/net10.0 # Change into the build output directory- Execute the build output. On Linux, Mac, etc. use
./jellyfinand on Windows usejellyfin.exe.
Accessing the Hosted Web Client
If the Server is configured to host the Web Client, and the Server is running, the Web Client can be accessed athttp://localhost:8096 by default.API documentation can be viewed at
http://localhost:8096/api-docs/swagger/index.htmlRunning from GitHub Codespaces
As Jellyfin will run on a container on a GitHub hosted server, JF needs to handle some things differently.NOTE: Depending on the selected configuration (if you just click 'create codespace' it will create a default configuration one) it might take 20-30 seconds to load all extensions and prepare the environment while VS Code is already open. Just give it some time and wait until you see
Downloading .NET version(s) 7.0.15~x64 ...... Done! in the output tab.NOTE: If you want to access the JF instance from outside, like with a WebClient on another PC, remember to set the "ports" in the lower VS Code window to public.
NOTE: When first opening the server instance with any WebUI, you will be sent to the login instead of the setup page. Refresh the login page once and you should be redirected to the Setup.
There are two configurations for you to choose from.
Default - Development Jellyfin Server
This creates a container that has everything to run and debug the Jellyfin Media server but does not setup anything else. Each time you create a new container you have to run through the whole setup again. There is also no ffmpeg, webclient or media preloaded. Use the.NET Launch (nowebclient) launch config to start the server.Keep in mind that as this has no web client you have to connect to it via an external client. This can be just another codespace container running the WebUI. vuejs does not work from the get-go as it does not support the setup steps.
Development Jellyfin Server ffmpeg
this extends the default server with a default installation of ffmpeg6 though the means described here: https://jellyfin.org/docs/general/installation/linux#repository-manual If you want to install a specific ffmpeg version, follow the comments embedded in the.devcontainer/Dev - Server Ffmpeg/install.ffmpeg.sh file.Use the
ghcs .NET Launch (nowebclient, ffmpeg) launch config to run with the jellyfin-ffmpeg enabled.Running The Tests
This repository also includes unit tests that are used to validate functionality as part of a CI pipeline on Azure. There are several ways to run these tests.- Run tests from the command line using
dotnet test - Run tests in Visual Studio using the Test Explorer
- Run individual tests in Visual Studio Code using the associated CodeLens annotation
Advanced Configuration
The following sections describe some more advanced scenarios for running the server from source that build upon the standard instructions above.Hosting The Web Client Separately
It is not necessary to host the frontend web client as part of the backend server. Hosting these two components separately may be useful for frontend developers who would prefer to host the client in a separate webpack development server for a tighter development loop. See the jellyfin-web repo for instructions on how to do this.To instruct the server not to host the web content, there is a
nowebclient configuration flag that must be set. This can be specified using the command line
switch --nowebclient or the environment variable JELLYFIN_NOWEBCONTENT=true.Since this is a common scenario, there is also a separate launch profile defined for Visual Studio called
Jellyfin.Server (nowebcontent) that can be selected from the 'Start Debugging' dropdown in the main toolbar.NOTE: The setup wizard cannot be run if the web client is hosted separately.
This project is supported by:

Serve Jellyfin (stack) on your own domain behind Caddy, Nginx or Traefik. Fill in your domain and copy the result. It's a starting point, some apps need their own base URL or extra headers set too.
Proxying jellyfin-stack.example.com to http://jellyfin:5000
Add this to your Caddyfile
jellyfin-stack.example.com {
	reverse_proxy http://jellyfin:5000
}Check the logs first
Nine times out of ten the logs tell you exactly what went wrong.
- In Portainer, go to Containers, click the container, then Logs. Or run
docker logs <container> - Exit codes help too:
137means killed, usually out of memory.126or127means the command inside the image is broken.
Port already in use
If deployment fails with "Bind for 0.0.0.0:5000 failed: port is already allocated", something else on your server is using that port.
- Find what's using it:
sudo ss -tlnp | grep :5000 - Stop the other service, or pick a different host port. In
5000:5000only the left number is yours to change, the right one belongs to the app.
Running but the page won't load
The container is up but nothing appears in your browser.
- Use your server's real IP:
http://your-server-ip:5000. The 0.0.0.0 link Portainer shows isn't a real address. - Give it a minute after first deploy, jellyfin can take a while to initialise.
- Make sure your firewall allows the port, e.g.
sudo ufw allow 5000
Container keeps restarting
The unless-stopped restart policy relaunches the app after every crash, so the real error can scroll past.
- Check the logs right after a restart, the last few lines before it died are the useful ones.
- Get the exit code with
docker inspect <container> --format '{{.State.ExitCode}}' - Still stuck? Redeploy once with the restart policy set to
noso the failure stays visible.
Stack won't deploy
Compose stacks fail fast on small mistakes, and Portainer shows the reason just above the editor.
- YAML only accepts spaces for indentation, a single tab breaks the whole file.
Raise an issue
Found something which isn't working as it should? Here's how to report it.
- Bug within the app: Open an issue on jellyfin/jellyfin
- Template not working: Open an issue on deployable-sh/stacks
- This website not working: Open an issue on lissy93/portainer-templates
A Compose stack
Jellyfin (stack) is a Compose stack, a set of containers defined in one file and brought up together by Portainer, then started and stopped as a single app.
Ports
A port is the door the app answers on. A mapping like 5000:5000 means it's reachable on port 5000 of your server, where the left number is yours to change and the right one belongs to the app. It opens:
5000:5000
Volumes
A volume is where Jellyfin (stack) keeps its files so they survive an update or a restart. Without one, anything it saves would sit inside the container and vanish the moment it's recreated. This template mounts:
/configkept in theconfigvolume Docker manages/cachekept in thecachevolume Docker manages/mediakept in themediavolume Docker manages
Environment variables
Environment variables are the settings you hand over when you deploy, things like a password or a timezone. Jellyfin (stack) takes 2 of them, all with defaults you can leave alone or tweak:
JELLYFIN_PublishedServerUrl, defaults tohttp://localhost:5000PUBLISHED_SERVER_URL, defaults tohttp://localhost:5000
Restart policy
The restart policy here is unless-stopped, so Docker restarts Jellyfin (stack) after a crash or reboot, but leaves it off when you stop it on purpose. You can change this on the deploy screen. The choices are no (never restart), on-failure (only after a crash), unless-stopped (restart unless you stop it), and always (bring it back no matter what).
Networking
Nothing custom is set, so Jellyfin (stack) sits on Docker's default bridge network: its own private space that reaches the outside world only through the ports it publishes.
Container name
Once it's deployed, Portainer names the container jellyfin. That's what you'll spot in the containers list and use in commands like docker logs jellyfin.
Built from source
Instead of pulling a ready-made image, this one is built on the spot from .. The first deploy takes a bit longer while it compiles, and the build files need to be there for it to work.
Platform
The platform is linux, the kind of system the container is built to run on. Docker and Portainer handle this on a normal Linux server.
Open source license
Jellyfin (stack) is open source, released under the GPL-2.0 license. In plain terms the code is out in the open, so you're free to run it and change it to fit what you need.
Portainer app templates
Zooming out, this whole page comes from a Portainer app template: a short recipe telling Portainer how to set Jellyfin (stack) up. Add the template list to Portainer once, then deploying Jellyfin (stack) is a click rather than a wall of config.