
pve-exporter
Stack
This is an exporter that exposes information gathered from Proxmox VE node for use by the Prometheus monitoring system.
Image details
Configuration
TypeComposelinuxprompve/prometheus-pve-exporter9221:9221/etc/pve.yml : /portainer/Files/AppData/Config/pve-exporteralwaysStandalone Install
Select an install method, to see config/commands for deploying pve-exporter
Install on Portainer
Import all app templates into your Portainer instance, for easy 1-click deploys
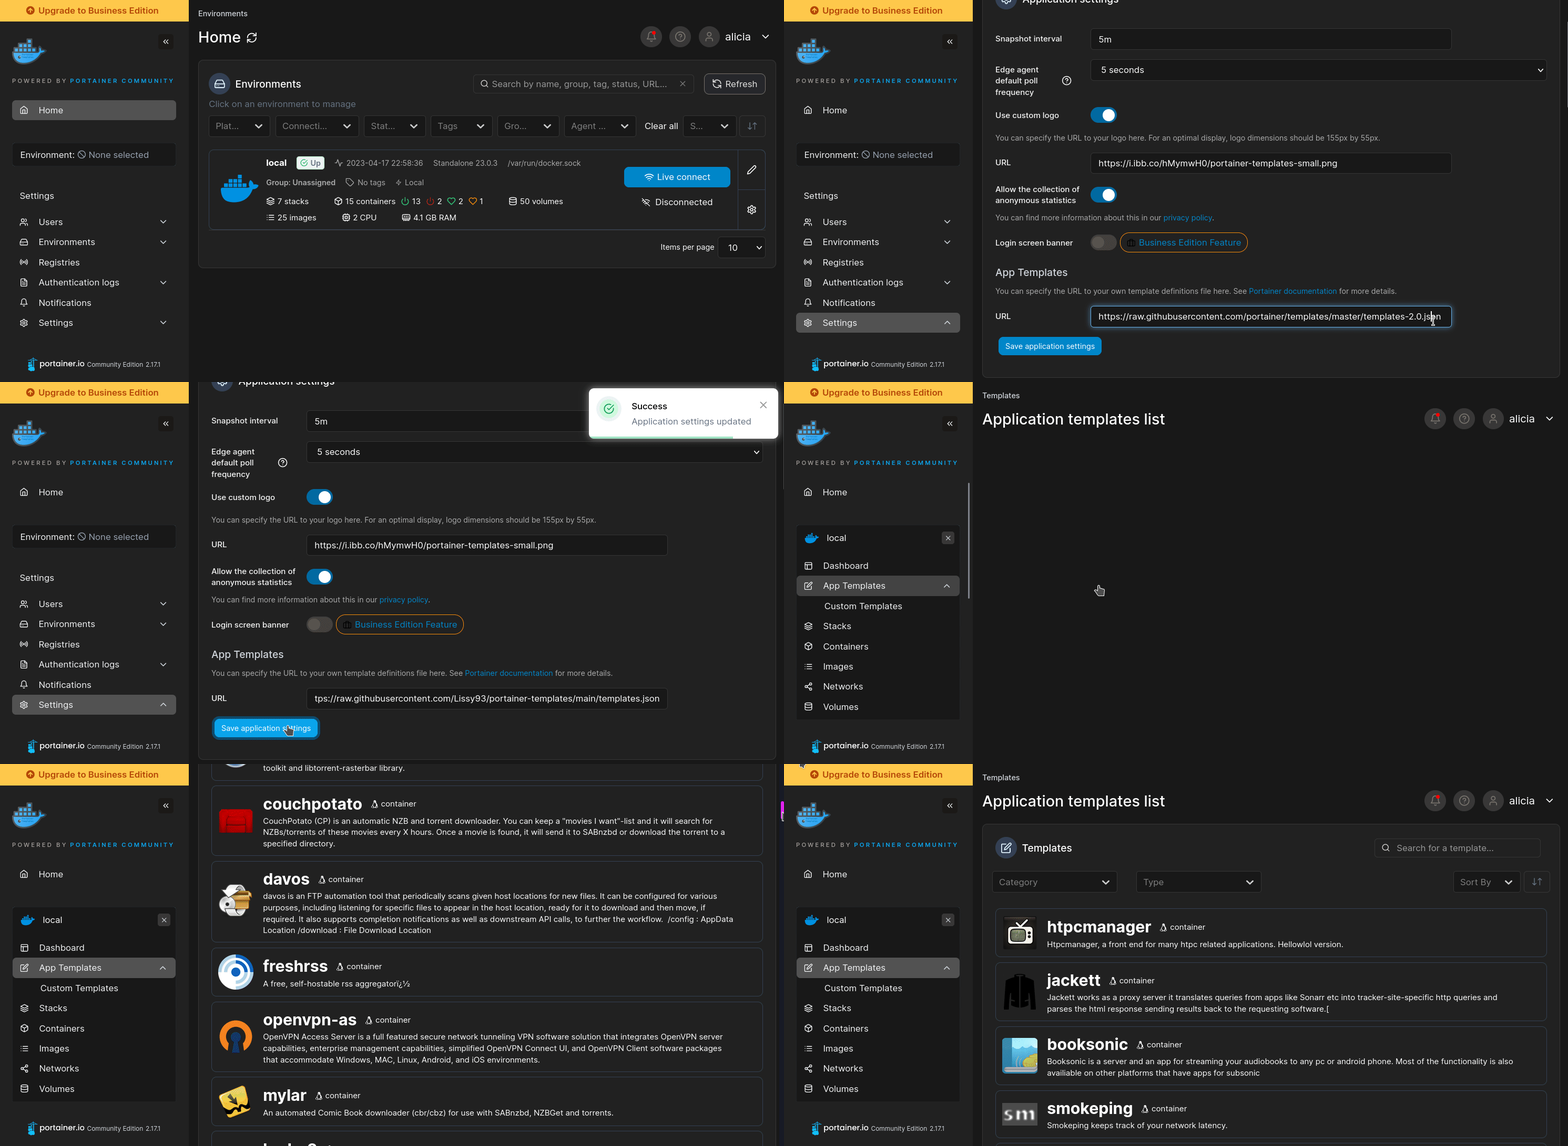
- Ensure both Docker and Portainer are installed, and up-to-date
- Log into your Portainer web UI
- Under Settings → App Templates, paste the below URL
- Head to Home → App Templates, and the list of apps will show up
- Select pve-exporter, fill in any config options, and hit Deploy
Template Import URL
https://raw.githubusercontent.com/Lissy93/portainer-templates/main/templates.json
Show Me
Original stackfile
The compose file this template deploys, straight from its repo:
services:
  pve-exporter:
    image: prompve/prometheus-pve-exporter
    container_name: pve-exporter
    ports:
      - 9221:9221
    volumes:
      - /portainer/Files/AppData/Config/pve-exporter:/etc/pve.yml
    restart: always
Or deploy it directly from the source:
git clone https://github.com/xneo1/portainer_templates
cd portainer_templates
docker compose -f Template/Stack/pve-exporter.yml up -d
More install options in our documentation.
Prometheus Proxmox VE Exporter
|Build Status| |Package Version|This is an exporter that exposes information gathered from Proxmox VE node for use by the Prometheus monitoring system.
Installation
Note: Python 2 is not supported anymore as of version 2.0.0. Instead use Python 3.6 or better.Using pip:
.. code:: shellpython3 -m pip install prometheus-pve-exporterUsing docker:
.. code:: shelldocker pull prompve/prometheus-pve-exporter.. code:: shell
docker run -it --rm prompve/prometheus-pve-exporter --help.. code:: shell
docker run --name prometheus-pve-exporter -d -p 127.0.0.1:9221:9221 -v /path/to/pve.yml:/etc/pve.yml prompve/prometheus-pve-exporterUsage
::usage: pve_exporter [-h] [--collector.status] [--collector.version]
[--collector.node] [--collector.cluster]
[--collector.resources] [--collector.config]
[config] [port] [address]
positional arguments:
config Path to configuration file (pve.yml)
port Port on which the exporter is listening (9221)
address Address to which the exporter will bind
optional arguments:
-h, --help show this help message and exit
--collector.status, --no-collector.status
Exposes Node/VM/CT-Status (default: True)
--collector.version, --no-collector.version
Exposes PVE version info (default: True)
--collector.node, --no-collector.node
Exposes PVE node info (default: True)
--collector.cluster, --no-collector.cluster
Exposes PVE cluster info (default: True)
--collector.resources, --no-collector.resources
Exposes PVE resources info (default: True)
--collector.config, --no-collector.config
Exposes PVE onboot status (default: True):: for the address argument in order to bind to both IPv6 and IPv4
sockets on dual stacked machines.Visit http://localhost:9221/pve?target=1.2.3.4 where 1.2.3.4 is the IP of the Proxmox VE node to get metrics from. Specify the `
module`
request parameter, to choose which module to use from the config file.The `
target request parameter defaults to localhost`. Hence if
`pve_exporter is deployed directly on the proxmox host, target`
can be omitted.Use the
--collector.X / --no-collector.X flags to enable disable selected
collectors.Note that that the config collector results in one API call per guest VM/CT. It is therefore recommended to disable this collector using the
--no-collector.config flag on big deployments.See the wiki for more examples and docs.
Authentication
Example `pve.yml` for password authentication:.. code:: yaml
default:
    user: prometheus@pve
password: sEcr3T!pve.yml for token authentication`:.. code:: yaml
default:
    user: prometheus@pve
    token_name: "..."
token_value: "..."proxmoxer.ProxmoxAPI().Note: When operating PVE with self-signed certificates, then it is necessary to either import the certificate into the local trust store (see this
SE answer
for Debian/Ubuntu) or add `verify_ssl: false` to the config dict as a sibling
to the credentials. Note that PVE supports Let's Encrypt out ouf the box. In
many cases setting up trusted certificates is the better option than operating
with self-signed certs.Proxmox VE Configuration
For security reasons it is essential to add a user with read-only access (PVEAuditor role) for the purpose of metrics collection.Prometheus Configuration
The PVE exporter can be deployed either directly on a Proxmox VE node or onto a separate machine.Example config for PVE exporter running on PVE node:
.. code:: yaml
scrape_configs:
  - job_name: 'pve'
    static_configs:
      - targets:
        - 192.168.1.2:9221  # Proxmox VE node with PVE exporter.
        - 192.168.1.3:9221  # Proxmox VE node with PVE exporter.
    metrics_path: /pve
    params:
module: [default].. code:: yaml
scrape_configs:
  - job_name: 'pve'
    static_configs:
      - targets:
        - 192.168.1.2  # Proxmox VE node.
        - 192.168.1.3  # Proxmox VE node.
    metrics_path: /pve
    params:
      module: [default]
    relabel_configs:
      - source_labels: [__address__]
        target_label: __param_target
      - source_labels: [__param_target]
        target_label: instance
      - target_label: __address__
        replacement: 127.0.0.1:9221  # PVE exporter.
Grafana Dashboards
Proxmox via Prometheus by Pietro Saccardi
.. |Build Status| image:: https://github.com/prometheus-pve/prometheus-pve-exporter/actions/workflows/ci.yml/badge.svg
:target: https://github.com/prometheus-pve/prometheus-pve-exporter/actions/workflows/ci.yml:target: https://pypi.python.org/pypi/prometheus-pve-exportertoken authentication: https://pve.proxmox.com/wiki/UserManagement#pveumtokens
.. proxmoxer.ProxmoxAPI(): https://pypi.python.org/pypi/proxmoxer
.. SE answer: https://askubuntu.com/a/1007236
.. supports Let's Encrypt: https://pve.proxmox.com/pve-docs/pve-admin-guide.html#sysadmincertificatemanagement
.. Proxmox via Prometheus by Pietro Saccardi: https://grafana.com/dashboards/10347Serve pve-exporter on your own domain behind Caddy, Nginx or Traefik. Fill in your domain and copy the result. It's a starting point, some apps need their own base URL or extra headers set too.
Proxying pve-exporter.example.com to http://pve-exporter:9221
Add this to your Caddyfile
pve-exporter.example.com {
	reverse_proxy http://pve-exporter:9221
}Check the logs first
Nine times out of ten the logs tell you exactly what went wrong.
- In Portainer, go to Containers, click the container, then Logs. Or run
docker logs <container> - Exit codes help too:
137means killed, usually out of memory.126or127means the command inside the image is broken.
Port already in use
If deployment fails with "Bind for 0.0.0.0:9221 failed: port is already allocated", something else on your server is using that port.
- Find what's using it:
sudo ss -tlnp | grep :9221 - Stop the other service, or pick a different host port. In
9221:9221only the left number is yours to change, the right one belongs to the app.
Running but the page won't load
The container is up but nothing appears in your browser.
- Use your server's real IP:
http://your-server-ip:9221. The 0.0.0.0 link Portainer shows isn't a real address. - Give it a minute after first deploy, pve-exporter can take a while to initialise.
- Make sure your firewall allows the port, e.g.
sudo ufw allow 9221
Permission denied on volumes
If the logs show "permission denied", the app can't write to its data folder on the host.
- Fix the ownership:
sudo chown -R 1000:1000 /portainer/Files/AppData/Config/pve-exporter
Image won't pull
Test the pull directly on the host: docker pull prompve/prometheus-pve-exporter
- "manifest unknown" means the tag no longer exists. This template uses
latest, so try pinning a specific version instead. - "toomanyrequests" is the Docker Hub rate limit. Log in with
docker loginto raise it. - "no space left on device" means a full disk. Reclaim space with
docker system prune
"exec format error"
This means the image was built for a different CPU architecture than your server.
- This image supports:
amd64, arm64 - Check yours with
uname -m: x86_64 is amd64, aarch64 is arm64. Raspberry Pi and other ARM boards are the usual culprits.
Container keeps restarting
The always restart policy relaunches the app after every crash, so the real error can scroll past.
- Check the logs right after a restart, the last few lines before it died are the useful ones.
- Get the exit code with
docker inspect <container> --format '{{.State.ExitCode}}' - Still stuck? Redeploy once with the restart policy set to
noso the failure stays visible.
Stack won't deploy
Compose stacks fail fast on small mistakes, and Portainer shows the reason just above the editor.
- YAML only accepts spaces for indentation, a single tab breaks the whole file.
Raise an issue
Found something which isn't working as it should? Here's how to report it.
- Bug within the app: Open an issue within pve-exporter's repo
- Template not working: Open an issue on xneo1/portainer_templates
- This website not working: Open an issue on lissy93/portainer-templates
A Compose stack
pve-exporter is a Compose stack, a set of containers defined in one file and brought up together by Portainer, then started and stopped as a single app.
The app image
An image is the app packed up ready to go, everything pve-exporter needs bundled into one download. This template pulls prompve/prometheus-pve-exporter, which Docker fetches once (about 49 MB) and then starts your own copy from.
Where the image comes from
Docker pulls its images from registries, public libraries of ready-built apps. pve-exporter's comes from Docker Hub, published by prompve.
Version tags
The bit after the colon in the image name is the version tag. Here it's latest, which always points at the newest build, so a redeploy can bump you to a newer release without you asking. Newest right now is 3.10. Pin a specific tag if you would rather stay on one version.
Which machines it runs on
Every image is built for particular CPU types. This one ships for amd64, arm64, so it runs on both regular x86 servers and ARM boards like a Raspberry Pi.
Ports
A port is the door the app answers on. A mapping like 9221:9221 means it's reachable on port 9221 of your server, where the left number is yours to change and the right one belongs to the app. It opens:
9221:9221
Volumes
A volume is where pve-exporter keeps its files so they survive an update or a restart. Without one, anything it saves would sit inside the container and vanish the moment it's recreated. This template mounts:
/etc/pve.ymlfrom/portainer/Files/AppData/Config/pve-exporteron the host
Restart policy
The restart policy here is always, so Docker brings pve-exporter back up after a crash and again when the server reboots. Good for anything you want running around the clock. You can change this on the deploy screen. The choices are no (never restart), on-failure (only after a crash), unless-stopped (restart unless you stop it), and always (bring it back no matter what).
Networking
Nothing custom is set, so pve-exporter sits on Docker's default bridge network: its own private space that reaches the outside world only through the ports it publishes.
Container name
Once it's deployed, Portainer names the container pve-exporter. That's what you'll spot in the containers list and use in commands like docker logs pve-exporter.
Platform
The platform is linux, the kind of system the container is built to run on. Docker and Portainer handle this on a normal Linux server.
Portainer app templates
Zooming out, this whole page comes from a Portainer app template: a short recipe telling Portainer how to set pve-exporter up. Add the template list to Portainer once, then deploying pve-exporter is a click rather than a wall of config.