
![Sealskin]() Sealskin
Sealskin
Container
Sealskin is a self-hosted, client-server platform that enables users to run powerful, containerized desktop applications streamed directly to a web browser. It uses a browser extension to intercept user actions—such as clicking a link or downloading a file and redirects them to a secure, isolated application environment running on a remote server.
Image details
Source details
Configuration
TypeContainerlinuxlinuxserver/sealskin:latest8443:8443/tcp8000:8000/tcp/config : /srv/lsio/sealskin/config/storage : /srv/lsio/sealskin/storage/var/run/docker.sock : /var/run/docker.sockPUID=1000PGID=1000TZ=Etc/UTCHOST_URL=IP or subdomain.doman.comunless-stoppedTemplate by technorabilia
Report issueNotes
Ensure to create the following volume directories on the host file system, or modify the paths in the volume mapping section under the advanced options below, as needed.
mkdir -p /srv/lsio/sealskin/config
mkdir -p /srv/lsio/sealskin/storage
Standalone Install
Select an install method, to see config/commands for deploying Sealskin
Install on Portainer
Import all app templates into your Portainer instance, for easy 1-click deploys
- Ensure both Docker and Portainer are installed, and up-to-date
- Log into your Portainer web UI
- Under Settings → App Templates, paste the below URL
- Head to Home → App Templates, and the list of apps will show up
- Select Sealskin, fill in any config options, and hit Deploy
Template Import URL
https://raw.githubusercontent.com/Lissy93/portainer-templates/main/templates.json
Show Me
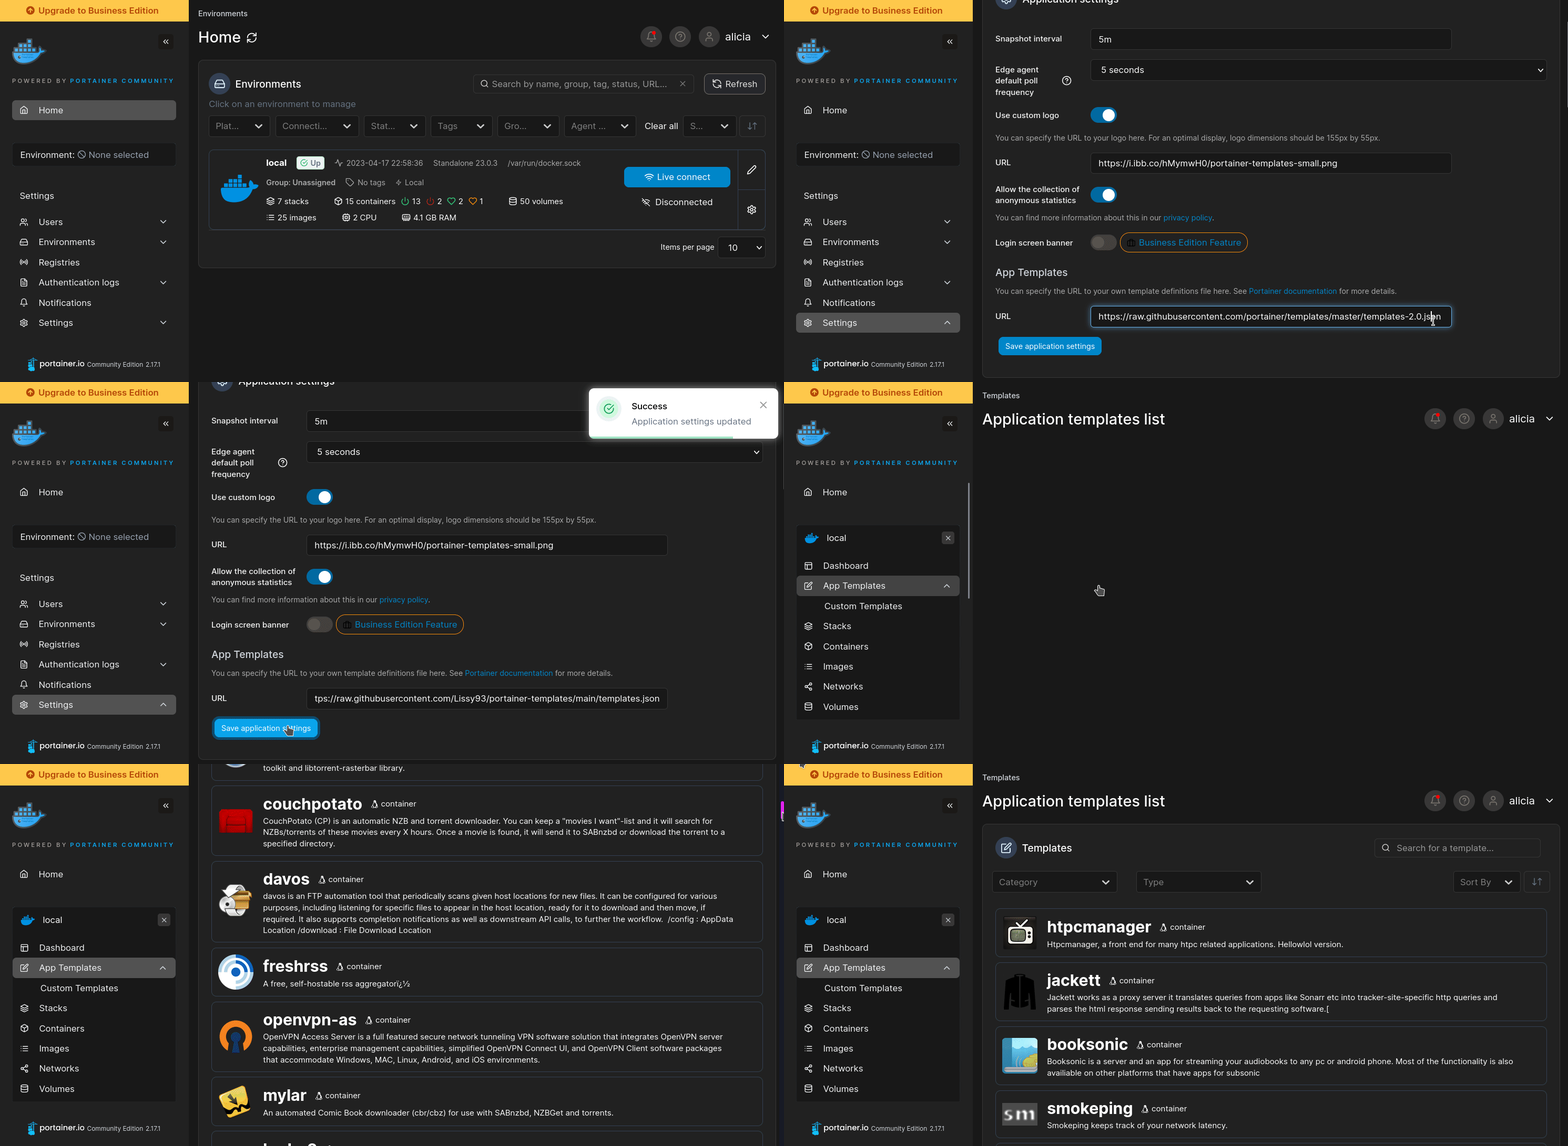
More install options in our documentation, or see selkies-project/sealskin for app-specific guidance.






The LinuxServer.io team brings you another container release featuring:
- regular and timely application updates
- easy user mappings (PGID, PUID)
- custom base image with s6 overlay
- weekly base OS updates with common layers across the entire LinuxServer.io ecosystem to minimise space usage, down time and bandwidth
- regular security updates
Find us at:
- Blog - all the things you can do with our containers including How-To guides, opinions and much more!
- Discord - realtime support / chat with the community and the team.
- Discourse - post on our community forum.
- GitHub - view the source for all of our repositories.
- Open Collective - please consider helping us by either donating or contributing to our budget
linuxserver/sealskin









Sealskin is a self-hosted, client-server platform that enables users to run powerful, containerized desktop applications streamed directly to a web browser. It uses a browser extension to intercept user actions—such as clicking a link or downloading a file and redirects them to a secure, isolated application environment running on a remote server.

Supported Architectures
We utilise the docker manifest for multi-platform awareness. More information is available from docker here and our announcement here.Simply pulling
lscr.io/linuxserver/sealskin:latest should retrieve the correct image for your arch, but you can also pull specific arch images via tags.The architectures supported by this image are:
| Architecture | Available | Tag |
|---|---|---|
| x86-64 | ✅ | amd64-\ |
| arm64 | ✅ | arm64v8-\ |
Application Setup
This image hosts the server component for the SealSkin platform.Download the browser extension from for Chrome HERE, for Firefox HERE.
On first init a file will be created
/config/admin.json if you set HOST_URL you can use this file for credentials as is, if you did not you will need to edit it and change the URL/IP set in the file to use it. Once authenticated in the extension you can generate users and new config files to distribute or use.>!NOTE >If you are not using a legitimate ssl certificate (default self signed in
/config/ssl) than you can only use the Chrome extension and must forward whatever port mapped to 8000 to the internet. Firefox enforces https in the extension space and Chrome allows us to fall back to E2EE over http.>!NOTE >Please remember to copy and delete the default
/config/admin.json file from your server for security, keep it somewhere safe!Scripted installtion
Included in this repository is a helper script to spin up sealskin with a legit certificate using Duck DNS, before using this script please navigate to https://www.duckdns.org/, log in, make a sub domain, and get your token.mkdir sealskin
cd sealskin
bash <(curl -sSL https://raw.githubusercontent.com/linuxserver/docker-sealskin/refs/heads/master/install.sh)This will setup pathing, ownership, docker config, and a legit wildcard SSL certificate for Duck DNS.
You can also renew your wildcard SSL certificate by using this same script.
cd sealskin
bash <(curl -sSL https://raw.githubusercontent.com/linuxserver/docker-sealskin/refs/heads/master/install.sh)Basic Requirements
It is important to use the container namesealskin as this is how the container identifies itself and determines its ports, volumes, and network. The only backend provider to launch containers is Docker. The storage paths are required for key and storage management while their mount paths are adapted from within the container to be run on the host for launched sessions. Everyting in the stack runs as the PUID and PGID down to the container desktop sessions, it is important that the user you use has access to the /config and /storage paths.The entire stack is not designed to run behind a reverse proxy, but it is meant to be directly exposed to the internet.
NVIDIA Support
Nvidia support only works on 580 and up full proprietary drivers (no MIT/GPL) withnvidia-drm.modeset=1 kernel parameter set. You must ensure the card is initialized before running a container so on headless systems run nvidia-modprobe --modeset from the host even with this kernel parameter set, this only needs to be run once per boot on headless systems.Key & Certificate Management
The server requires several cryptographic keys to function. You can either let the server perform an automatic setup on its first run or manually provide your own keys for more control.Automatic First-Run Setup (Recommended)
This is the simplest method. On the first launch with an empty/config volume:- An init process automatically generates the mandatory server key (
server_key.pem) and a self-signed SSL certificate for the proxy (proxy_key.pem,proxy_cert.pem). - The application will then detect that no administrator exists, create a default user named
admin, and output a configuration file admin.json into the/config/directory.
Your only action is if the
HOST_URL environment variable is not set to replace the HOST_URL string in the file with your IP/URL.Manual Pre-Configuration (Advanced)
If you wish to use your own administrator key or provide a valid SSL certificate, you can place the necessary files in the/config volume before the first launch.- To use a custom Admin Key:
1.  Generate your own RSA keypair.
2.  Create a file containing only your **public key** PEM data at the following location:
    *   **Path:** `/path/to/config/.config/sealskin/keys/admins/admin`
3. The server will detect this file and skip the automatic admin creation. You will use your corresponding private key to log in from the extension.- To use a custom SSL Certificate:
*   Place your SSL private key and certificate file at these locations. This will override the self-signed certificate generated by the init process.
    *   **Key Path:** `/path/to/config/ssl/proxy_key.pem`
* **Cert Path:** `/path/to/config/ssl/proxy_cert.pem`- To use a custom Server E2EE Key:
*   Place your RSA private key at this location. This is the core key for the API's end-to-end encryption and validates the server when a user sets the servers public key when configuring the extension.
    *   **Path:** `/path/to/config/ssl/server_key.pem`
    *   **Generation Command:** `openssl genpkey -algorithm RSA -out /path/to/config/ssl/server_key.pem -pkeyopt rsa_keygen_bits:2048`
*   To obtain the corresponding public key (which is needed by the browser extension), you can extract it from your private key with this command:
    *   **Extraction Command:** `openssl rsa -in server_key.pem -pubout`
Usage
To help you get started creating a container from this image you can either use docker-compose or the docker cli.>!NOTE >Unless a parameter is flagged as 'optional', it is mandatory and a value must be provided.
docker-compose (recommended, click here for more info)
---
services:
  sealskin:
    image: lscr.io/linuxserver/sealskin:latest
    container_name: sealskin
    environment:
      - PUID=1000
      - PGID=1000
      - TZ=Etc/UTC
      - "HOST_URL=IP or subdomain.doman.com" #optional
    volumes:
      - /path/to/sealskin/config:/config
      - /path/to/sealskin/storage:/storage
      - /var/run/docker.sock:/var/run/docker.sock
    ports:
      - 8443:8443
      - 8000:8000 #optional
    restart: unless-stopped
docker cli (click here for more info)
docker run -d \
  --name=sealskin \
  -e PUID=1000 \
  -e PGID=1000 \
  -e TZ=Etc/UTC \
  -e HOST_URL="IP or subdomain.doman.com" `#optional` \
  -p 8443:8443 \
  -p 8000:8000 `#optional` \
  -v /path/to/sealskin/config:/config \
  -v /path/to/sealskin/storage:/storage \
  -v /var/run/docker.sock:/var/run/docker.sock \
  --restart unless-stopped \
  lscr.io/linuxserver/sealskin:latest
Parameters
Containers are configured using parameters passed at runtime (such as those above). These parameters are separated by a colon and indicate<external>:<internal> respectively. For example, -p 8080:80 would expose port 80 from inside the container to be accessible from the host's IP on port 8080 outside the container.| Parameter | Function |
|---|---|
-p 8443:8443 | HTTPS Sessions and API communication port. |
-p 8000 | HTTP Fallback API communication port. |
-e PUID=1000 | for UserID - see below for explanation |
-e PGID=1000 | for GroupID - see below for explanation |
-e TZ=Etc/UTC | specify a timezone to use, see this list. |
-e HOSTURL=IP or subdomain.doman.com | On initial setup this will be used to fill in the default admin configuration file in the /config directory, if unset the string HOSTURL will need to be replaced. |
-v /config | All configuration files and metadata for the application. |
-v /storage | All file storage for home directories and ephemeral mounts. |
-v /var/run/docker.sock | Docker socket, required to spin up application containers. |
Environment variables from files (Docker secrets)
You can set any environment variable from a file by using a special prependFILE__.As an example:
-e FILE__MYVAR=/run/secrets/mysecretvariableWill set the environment variable
MYVAR based on the contents of the /run/secrets/mysecretvariable file.Umask for running applications
For all of our images we provide the ability to override the default umask settings for services started within the containers using the optional-e UMASK=022 setting.
Keep in mind umask is not chmod it subtracts from permissions based on it's value it does not add. Please read up here before asking for support.User / Group Identifiers
When using volumes (-v flags), permissions issues can arise between the host OS and the container, we avoid this issue by allowing you to specify the user PUID and group PGID.Ensure any volume directories on the host are owned by the same user you specify and any permissions issues will vanish like magic.
In this instance
PUID=1000 and PGID=1000, to find yours use id your_user as below:id your_userExample output:
uid=1000(your_user) gid=1000(your_user) groups=1000(your_user)Docker Mods


We publish various Docker Mods to enable additional functionality within the containers. The list of Mods available for this image (if any) as well as universal mods that can be applied to any one of our images can be accessed via the dynamic badges above.
Support Info
- Shell access whilst the container is running:
```bash
docker exec -it sealskin /bin/bash
```- To monitor the logs of the container in realtime:
```bash
docker logs -f sealskin
```- Container version number:
```bash
docker inspect -f '{{ index .Config.Labels "build_version" }}' sealskin
```- Image version number:
```bash
docker inspect -f '{{ index .Config.Labels "build_version" }}' lscr.io/linuxserver/sealskin:latest
```
Updating Info
Most of our images are static, versioned, and require an image update and container recreation to update the app inside. With some exceptions (noted in the relevant readme.md), we do not recommend or support updating apps inside the container. Please consult the Application Setup section above to see if it is recommended for the image.Below are the instructions for updating containers:
Via Docker Compose
- Update images:
* All images:

    ```bash
    docker-compose pull
    ```

* Single image:

    ```bash
    docker-compose pull sealskin
```- Update containers:
* All containers:

    ```bash
    docker-compose up -d
    ```

* Single container:

    ```bash
    docker-compose up -d sealskin
```- You can also remove the old dangling images:
```bash
docker image prune
```
Via Docker Run
- Update the image:
```bash
docker pull lscr.io/linuxserver/sealskin:latest
```- Stop the running container:
```bash
docker stop sealskin
```- Delete the container:
```bash
docker rm sealskin
```- Recreate a new container with the same docker run parameters as instructed above (if mapped correctly to a host folder, your
/configfolder and settings will be preserved) - You can also remove the old dangling images:
```bash
docker image prune
```
Image Update Notifications - Diun (Docker Image Update Notifier)
>!TIP >We recommend Diun for update notifications. Other tools that automatically update containers unattended are not recommended or supported.Building locally
If you want to make local modifications to these images for development purposes or just to customize the logic:git clone https://github.com/linuxserver/docker-sealskin.git
cd docker-sealskin
docker build \
--no-cache \
--pull \
-t lscr.io/linuxserver/sealskin:latest .The ARM variants can be built on x8664 hardware and vice versa using
lscr.io/linuxserver/qemu-staticdocker run --rm --privileged lscr.io/linuxserver/qemu-static --resetOnce registered you can define the dockerfile to use with
-f Dockerfile.aarch64.Versions
- 05.09.26: - Install Sealskin from the upstream Python wheel, rebase to Alpine 3.24.
- 11.02.26: - Rebase to Alpine 3.23.
- 19.01.26: - Fix init race condition.
- 17.01.26: - Update docs to remove network and port requirement, add link to Firefox add on.
- 08.01.26: - Improve permission fixing.
- 31.10.25: - Initial Release.
Serve Sealskin on your own domain behind Caddy, Nginx or Traefik. Fill in your domain and copy the result. It's a starting point, some apps need their own base URL or extra headers set too.
Proxying sealskin.example.com to https://Sealskin:8443
Add this to your Caddyfile
sealskin.example.com {
	reverse_proxy https://Sealskin:8443 {
		transport http {
			tls_insecure_skip_verify
		}
	}
}Check the logs first
Nine times out of ten the logs tell you exactly what went wrong.
- In Portainer, go to Containers, click the container, then Logs. Or run
docker logs Sealskin - Exit codes help too:
137means killed, usually out of memory.126or127means the command inside the image is broken.
Port already in use
If deployment fails with "Bind for 0.0.0.0:8443 failed: port is already allocated", something else on your server is using that port.
- Find what's using it:
sudo ss -tlnp | grep :8443 - Stop the other service, or pick a different host port. In
8443:8443only the left number is yours to change, the right one belongs to the app.
Running but the page won't load
The container is up but nothing appears in your browser.
- Use your server's real IP:
http://your-server-ip:8000. The 0.0.0.0 link Portainer shows isn't a real address. - Give it a minute after first deploy, Sealskin can take a while to initialise.
- Make sure your firewall allows the port, e.g.
sudo ufw allow 8000
Permission denied on volumes
If the logs show "permission denied", the app can't write to its data folder on the host.
- Fix the ownership:
sudo chown -R 1000:1000 /srv/lsio/sealskin/config(and the same for the other mapped folders) - Or set the
PUIDandPGIDvariables (defaults 1000:1000) to match your own user, found withid $USER
Can't reach the Docker socket
Sealskin talks to Docker through /var/run/docker.sock. If the logs show
"permission denied while trying to connect to the Docker daemon socket", the app's user can't access it.
- Check the socket exists on the host:
ls -l /var/run/docker.sock - Run the container as root, or add the docker group's id to the container with
group_add.
Image won't pull
Test the pull directly on the host: docker pull linuxserver/sealskin:latest
- "manifest unknown" means the tag no longer exists. This template uses
latest, so try pinning a specific version instead. - "toomanyrequests" is the Docker Hub rate limit. Log in with
docker loginto raise it. - "no space left on device" means a full disk. Reclaim space with
docker system prune
"exec format error"
This means the image was built for a different CPU architecture than your server.
- This image supports:
amd64, arm64 - Check yours with
uname -m: x86_64 is amd64, aarch64 is arm64. Raspberry Pi and other ARM boards are the usual culprits.
Container keeps restarting
The unless-stopped restart policy relaunches the app after every crash, so the real error can scroll past.
- Check the logs right after a restart, the last few lines before it died are the useful ones.
- Get the exit code with
docker inspect Sealskin --format '{{.State.ExitCode}}' - Still stuck? Redeploy once with the restart policy set to
noso the failure stays visible.
Raise an issue
Found something which isn't working as it should? Here's how to report it.
- Bug within the app: Open an issue on selkies-project/sealskin
- Template not working: Open an issue on technorabilia/portainer-templates
- This website not working: Open an issue on lissy93/portainer-templates
A single container
Sealskin runs as one container, the simplest kind of app here. Just the one image to pull and nothing else wired up alongside it.
The app image
An image is the app packed up ready to go, everything Sealskin needs bundled into one download. This template pulls linuxserver/sealskin:latest, which Docker fetches once (about 69 MB) and then starts your own copy from.
Where the image comes from
Docker pulls its images from registries, public libraries of ready-built apps. Sealskin's comes from Docker Hub, published by linuxserver.
Version tags
The bit after the colon in the image name is the version tag. Here it's latest, which always points at the newest build, so a redeploy can bump you to a newer release without you asking. Newest right now is 0.3.2. Pin a specific tag if you would rather stay on one version.
Which machines it runs on
Every image is built for particular CPU types. This one ships for amd64, arm64, so it runs on both regular x86 servers and ARM boards like a Raspberry Pi.
Ports
A port is the door the app answers on. A mapping like 8443:8443 means it's reachable on port 8443 of your server, where the left number is yours to change and the right one belongs to the app. Once it's running, open http://your-server-ip:8000 in a browser. It opens:
8443:84438000:8000, likely the web interface
Volumes
A volume is where Sealskin keeps its files so they survive an update or a restart. Without one, anything it saves would sit inside the container and vanish the moment it's recreated. This template mounts:
/configfrom/srv/lsio/sealskin/configon the host/storagefrom/srv/lsio/sealskin/storageon the host/var/run/docker.sockfrom/var/run/docker.sockon the host (a socket it talks to, not storage)
Environment variables
Environment variables are the settings you hand over when you deploy, things like a password or a timezone. Sealskin takes 4 of them, all with defaults you can leave alone or tweak:
PUID, defaults to1000. Run 'id [USER]' for the owner of the host volume directories to get the UID to use here.PGID, defaults to1000. Run 'id [USER]' for the owner of the host volume directories to get the GID to use here.TZ, defaults toEtc/UTC. Specify a timezone to use, see this list.HOST_URL, defaults toIP or subdomain.doman.com. On initial setup this will be used to fill in the default admin configuration file in the /config directory, if unset the string HOSTURL will need to be replaced. [OPTIONAL]
Restart policy
The restart policy here is unless-stopped, so Docker restarts Sealskin after a crash or reboot, but leaves it off when you stop it on purpose. You can change this on the deploy screen. The choices are no (never restart), on-failure (only after a crash), unless-stopped (restart unless you stop it), and always (bring it back no matter what).
Users and permissions
The PUID and PGID settings tell it which user and group to act as on your host. Point them at your own account (find yours with id $USER) so the files it writes into your mounted folders come out owned by you rather than root.
Networking
Nothing custom is set, so Sealskin sits on Docker's default bridge network: its own private space that reaches the outside world only through the ports it publishes.
Container name
Once it's deployed, Portainer names the container Sealskin. That's what you'll spot in the containers list and use in commands like docker logs Sealskin.
Platform
The platform is linux, the kind of system the container is built to run on. Docker and Portainer handle this on a normal Linux server.
Open source license
Sealskin is open source, released under the MPL-2.0 license. In plain terms the code is out in the open, so you're free to run it and change it to fit what you need.
Portainer app templates
Zooming out, this whole page comes from a Portainer app template: a short recipe telling Portainer how to set Sealskin up. Add the template list to Portainer once, then deploying Sealskin is a click rather than a wall of config.