
![System Stats OLED display]() System Stats OLED display
System Stats OLED display
Container
A quick way to display system stats on a 128x64 I2C OLED display.
Image details
Source details
Configuration
TypeContainerlinuxmklements/oled_stats:latestYes/etc/timezone : /etc/timezone/etc/localtime : /etc/localtimestart=8end=23unless-stoppedTemplate by novaspirit
Report issueNotes
Check our Github page: https://github.com/pi-hosted/pi-hosted
Official Webpage: https://www.the-diy-life.com/
Official Docker Documentation: https://github.com/mklements/OLED_Stats_Docker
Run this command first to enable is2 communication! \nsudo raspi-config nonint do_i2c 0\nsudo /DietPi/dietpi/func/dietpi-set_hardware i2c enable || sudo /boot/dietpi/func/dietpi-set_hardware i2c enable\n
Standalone Install
Select an install method, to see config/commands for deploying System Stats OLED display
Install on Portainer
Import all app templates into your Portainer instance, for easy 1-click deploys
- Ensure both Docker and Portainer are installed, and up-to-date
- Log into your Portainer web UI
- Under Settings → App Templates, paste the below URL
- Head to Home → App Templates, and the list of apps will show up
- Select System Stats OLED display, fill in any config options, and hit Deploy
Template Import URL
https://raw.githubusercontent.com/Lissy93/portainer-templates/main/templates.json
Show Me
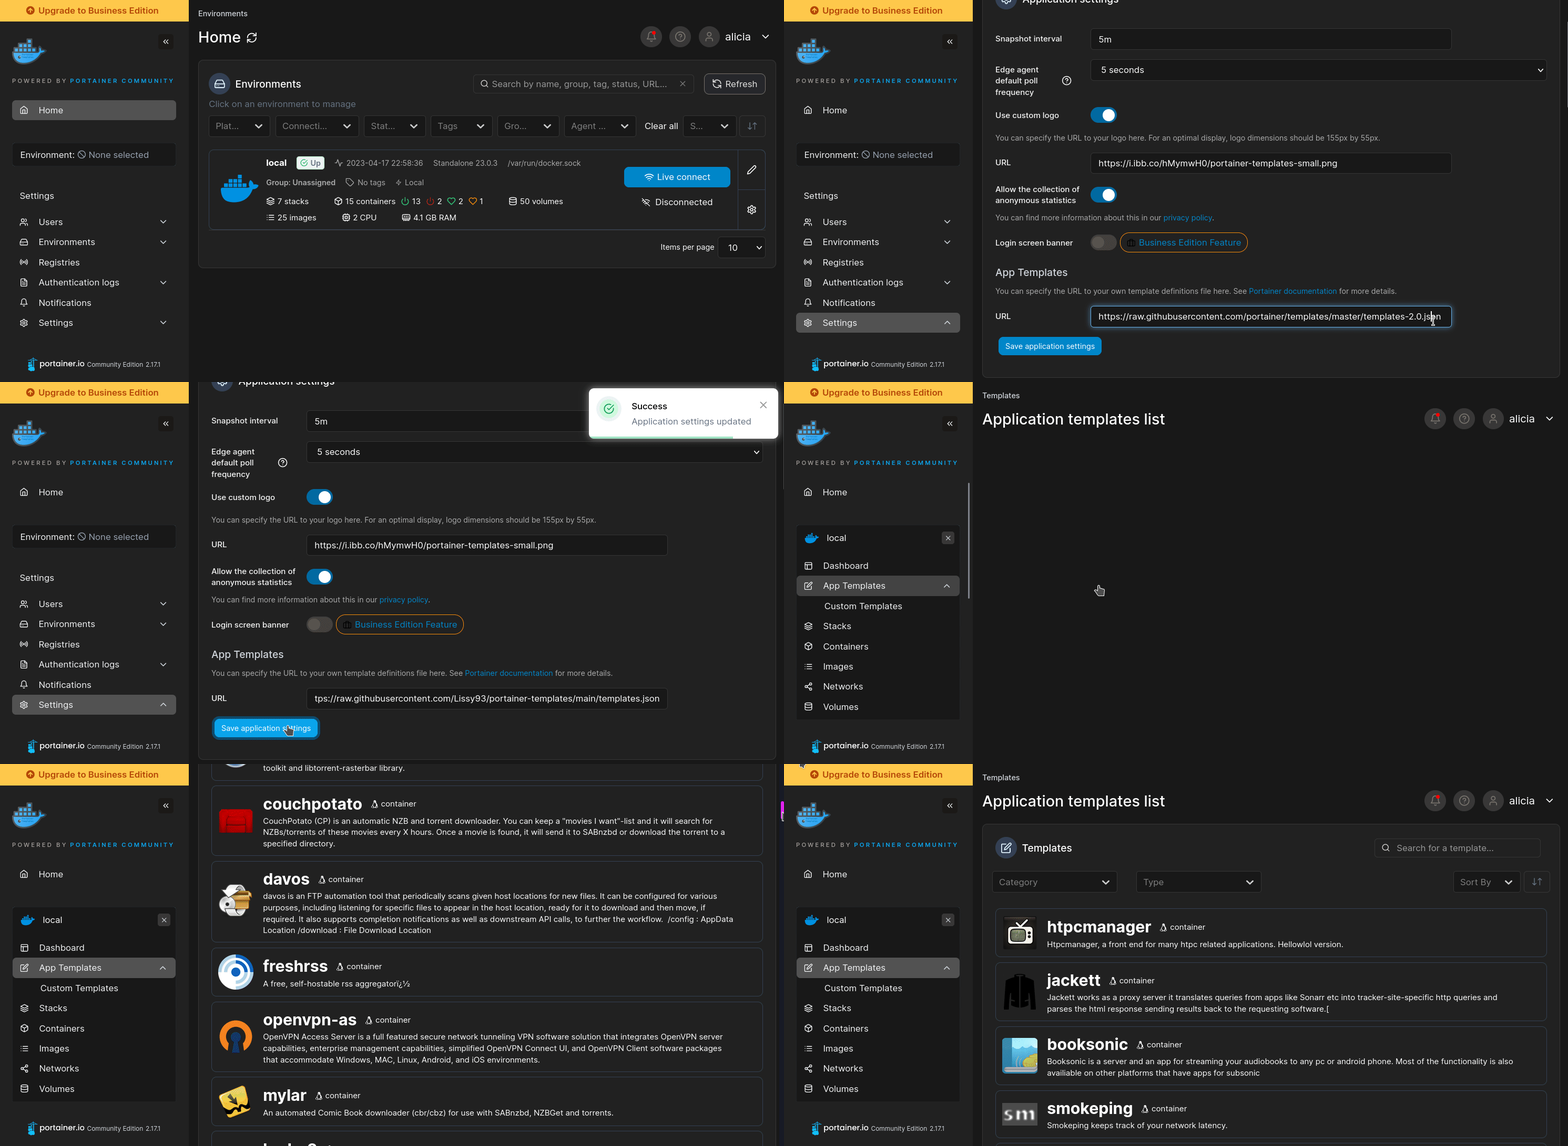
More install options in our documentation, or see mklements/oled_stats for app-specific guidance.
OLED Stats
OLED Stats Display Script For A Raspberry Pi Running Raspberry Pi OS Bookworm. The installation process and script have been tested on a Pi Zero 2w, 3, 4 and 5.Full setup instructions available on my blog - https://www.the-diy-life.com/add-an-oled-stats-display-to-raspberry-pi-os-bookworm/ Or my Youtube Channel - https://youtu.be/pdaDvPCdAlY
The script is pre-configured for 128x64 I2C OLED Display, but can easily be modified to run on a 128x32 I2C OLED Display
Screenshots:
Installation Steps:
- Connect GND, VCC(3.3v), SCL, & SDA ports of the display according to the picture shown below:
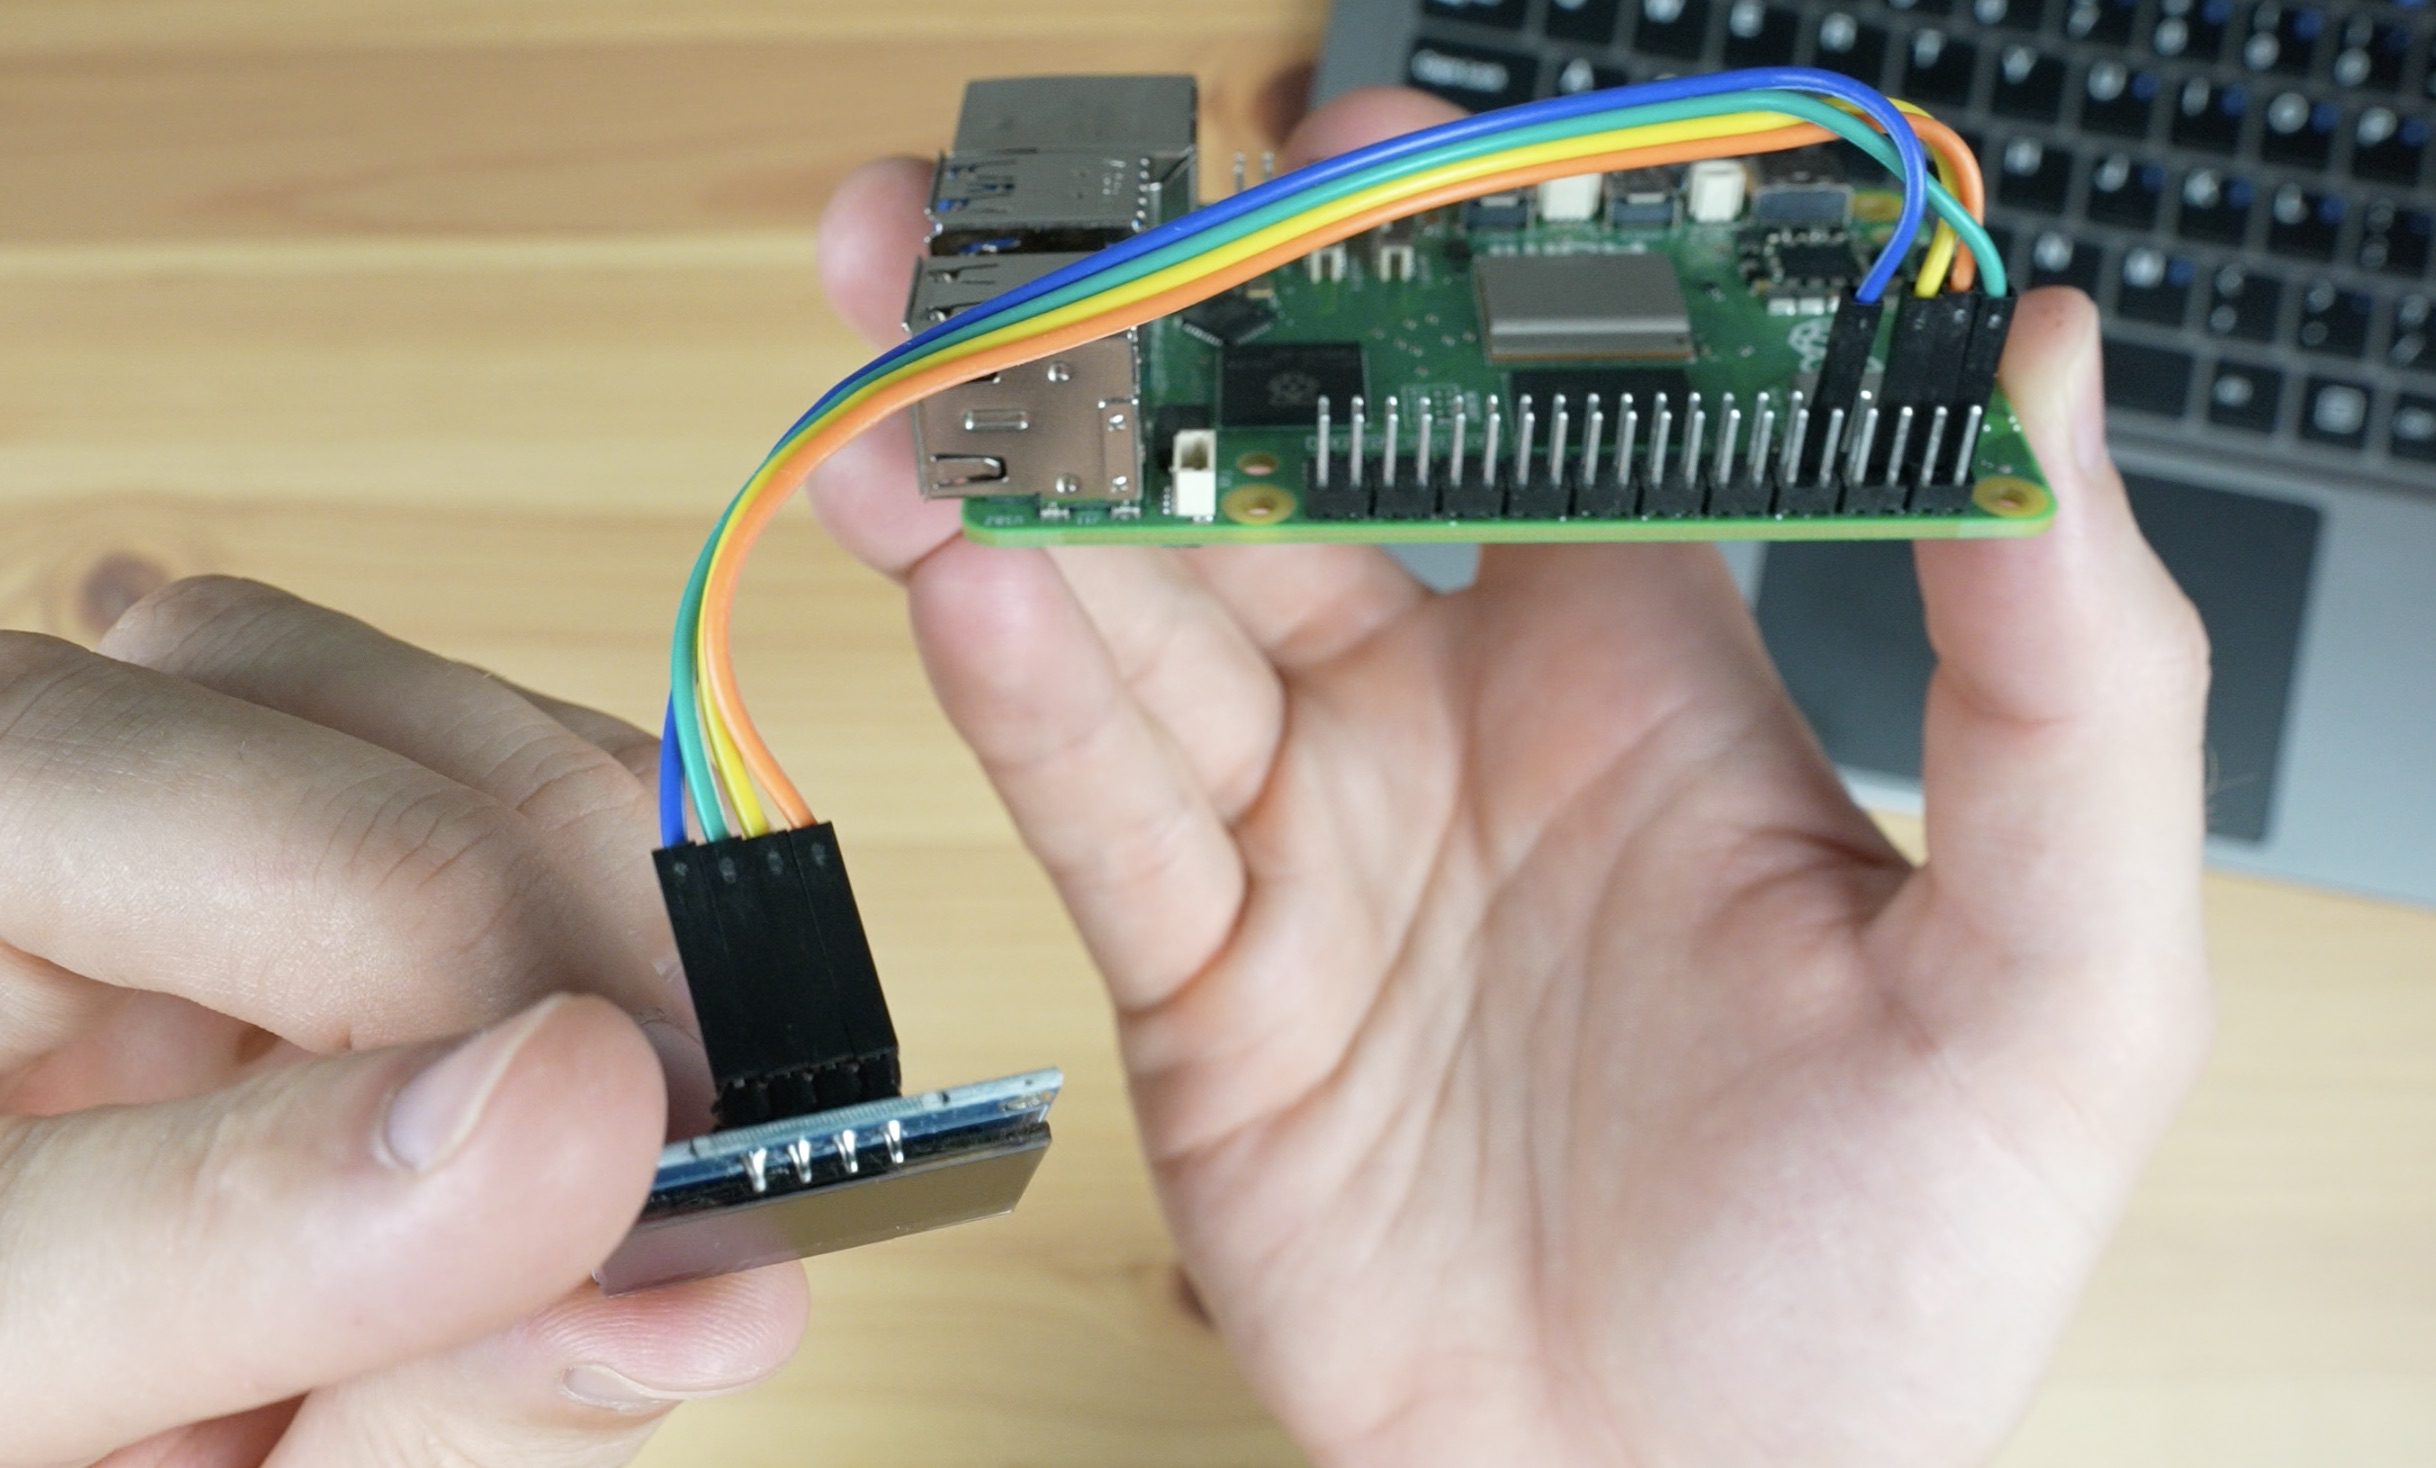
- Upgrade your Raspberry Pi firmware and reboot:
sudo apt-get updatesudo apt-get -y upgradesudo reboot- Install python3-pip & upgrade setuptools
sudo apt-get install python3-pipsudo apt install --upgrade python3-setuptools- Next, we need to create a virtual environment called statsenv. This is required as of the release of OS Bookworm. On completion, you should see (statsenv) at the start of your current terminal line
sudo apt install python3-venvpython3 -m venv stats_env --system-site-packagessource stats_env/bin/activate- Next, we will install the Adafruit Blinka library using the following commands. Confirm "Y" when prompted to reboot at the end of the installation.
cd ~pip3 install --upgrade adafruit-python-shellwget https://raw.githubusercontent.com/adafruit/Raspberry-Pi-Installer-Scripts/master/raspi-blinka.pysudo -E env PATH=$PATH python3 raspi-blinka.py- Check the
I2Cstatus using the below command. You should see a table with the address 3c showing up - this is the address of the OLED display.
sudo i2cdetect -y 10 1 2 3 4 5 6 7 8 9 a b c d e f
00: -- -- -- -- -- -- -- --
10: -- -- -- -- -- -- -- -- -- -- -- -- -- -- -- --
20: -- -- -- -- -- -- -- -- -- -- -- -- -- -- -- --
30: -- -- -- -- -- -- -- -- -- -- -- -- 3c -- -- --
40: -- -- -- -- -- -- -- -- -- -- -- -- -- -- -- --
50: -- -- -- -- -- -- -- -- -- -- -- -- -- -- -- --
60: -- -- -- -- -- -- -- -- -- -- -- -- -- -- -- --
70: -- -- -- -- -- -- -- --If no address shows up, check your display connections to the Pi and that the I2C interface has been activated. Use the below command to open up configuration options, then select "3 Interfacing Options", then select "I5 I2C", "Yes" to enable the interface, "Ok" and then "Finish"
sudo raspi-config- Next, we need to install the CircuitPython libraries specific to the display. Start by re-entering the created virtual environment and then enter the below commands to install the libraries
source stats_env/bin/activatepip3 install --upgrade adafruit_blinkapip3 install adafruit-circuitpython-ssd1306sudo apt-get install python3-pil- Now we need to exit the virtual environment and download the Python script from our GitHub repository
deactivatesudo apt-get install gitgit clone https://github.com/mklements/OLED_Stats.git- Now re-enter the virtual environment to run the stats script
source stats_env/bin/activatecd OLED_Stats- There are several options for scripts to run. Choose the one that best suits your needs:
stats.py- A simple text-based display.monitor.py- A display with icons.psutilstats.py- Uses psutil for better compatibility on non-Raspbian distros.status.py- An enhanced text-based display.
Run one of the commands below to test the chosen script:
python3 stats.pyor
python3 monitor.pyor
python3 psutilstats.pyor
python3 status.py- The script should now be running and your display showing your Pi's IP address and stats, but if you close the terminal window then it'll stop being updated. To get the script to run automatically on start-up and continue to update itself, we need to make an executable file. You'll need to open a new terminal window for the below steps.
Remember to change your username ("pi" below) if you're not using a default username
curl -OL https://raw.githubusercontent.com/mklements/OLED_Stats/main/OLED_displaysudo chmod +x /home/pi/OLED_displayThe OLEDdisplay script runs the stats.py file by default. To change this to the monitor.py file, you'll need to open it up in a text or code editor and change the target filename from stats.py to monitor.py.
Do this with the below command
sudo nano /home/pi/OLED_displayNow we need to tell the Pi to run this file on startup. We do this by opening up crontab using the below command and then adding a line at the bottom of the text file. If it's your first time opening up crontab, it'll prompt you to select an editor - enter 1 to open it up in nano.
```shell
crontab -e
**Add this to the bottom:**

Remember to change your username ("pi" below) if you're not using a default username## 🚀 Auto-Installation Script (Easy to Use with Pi OS)
### `>` Quick & Easy Installation
For the fastest setup experience, use the installation script that handles everything for you!
> [!TIP]
> The average setup time on a Raspberry Pi 3B v1.2 is approximately 5 minutes.
#### **One-Line Installation**
1. Run this command in your terminal to start the installation:
```bash
curl -fsSL https://raw.githubusercontent.com/4ngel2769/rpi_oled_stats/main/autoinstall_oled_stats.sh | bash- When close to being done, the script will prompt you to select your preferred display script:
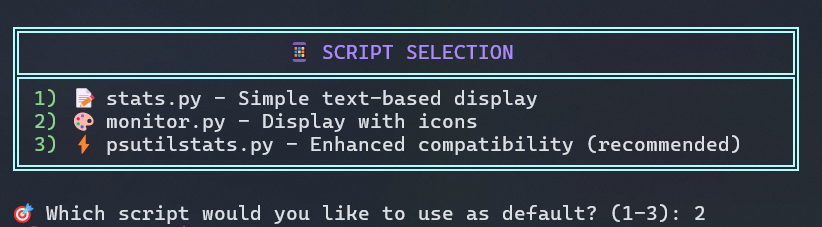
- If everything goes well, you should receive a success message like this:
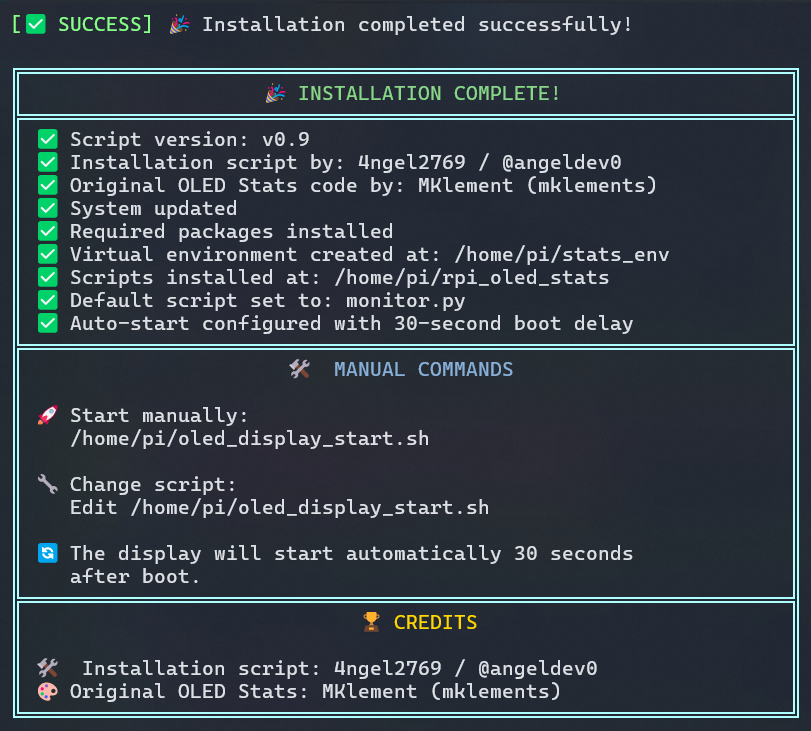
- As a final step, you will be prompted to reboot your Raspberry Pi to start using the display. You can choose
yorn:

- After rebooting, your OLED display should start showing system stats automatically after about 30 seconds.
🎉 Enjoy your new OLED stats display! 🎉
Some additional options for customization and troubleshooting:
🔍 Verbose Installation (see detailed output)
curl -fsSL https://raw.githubusercontent.com/4ngel2769/rpi_oled_stats/main/autoinstall_oled_stats.sh | bash -s -- --verbose!NOTE
Using the--verboseflag will show detailed installation progress.
🛠️ Advanced Options
# Combine verbose with custom theme
curl -fsSL https://raw.githubusercontent.com/4ngel2769/rpi_oled_stats/main/autoinstall_oled_stats.sh | bash -s -- --theme 2 --verbose

# Show help
curl -fsSL https://raw.githubusercontent.com/4ngel2769/rpi_oled_stats/main/autoinstall_oled_stats.sh | bash -s -- --help

# Show version
curl -fsSL https://raw.githubusercontent.com/4ngel2769/rpi_oled_stats/main/autoinstall_oled_stats.sh | bash -s -- --version
What the Auto-Installer Does:
- ✅ System Check: Verifies you're running on a Raspberry Pi
- ✅ Package Updates: Updates system packages automatically
- ✅ Dependencies: Installs all required packages (python3-pip, python3-venv, git, i2c-tools)
- ✅ Virtual Environment: Creates and configures Python virtual environment
- ✅ Libraries: Installs Adafruit CircuitPython libraries and dependencies
- ✅ Repository: Clones this repository and downloads required fonts
- ✅ I2C Detection: Checks for OLED display connectivity
- ✅ Script Selection: Lets you choose between stats.py, monitor.py, psutilstats.py, or status.py
- ✅ Auto-Start: Configures automatic startup on boot with 30-second delay
- ✅ Testing: Tests your selected script for 5 seconds to verify functionality
Available Themes:
| Theme | Description | Best For |
|---|---|---|
| 1 - Standard | Classic terminal colors | Clean terminal |
| 2 - HTB | HackTheBox style | Security enthusiasts, bright displays |
| 3 - Pastel | Soft and pleasant colors | Easy on the eyes |
Prerequisites:
!IMPORTANT
Before running the installation script, ensure your OLED display is properly connected to the Raspberry Pi I2C pins (GND, VCC, SDA, SCL).
- Hardware Setup: Connect your OLED display to the Raspberry Pi I2C pins
- Fresh Pi: Works best on a fresh Raspberry Pi OS Bookworm installation
- Internet: Stable internet connection for downloading packages
- Sudo Access: The script needs sudo privileges for system changes
!WARNING
The script will make system-level changes including package installations and system configurations. Ensure you're running this on a system you're comfortable modifying.
⚡ Installation Time:
- ~3-5 minutes (5 minutes average on an older Pi 3B v1.2)
🔧 Post-Installation:
After installation, your OLED display will:- Start automatically 30 seconds after boot
- Display system stats continuously
- Can be manually started with:
~/oled_display_start.sh
!TIP
After installation completes, you can test your display immediately by running ~/oled_display_start.sh without rebooting.🆘 Need Help?
!CAUTION If the installation fails or your display doesn't work, avoid running the script multiple times without cleaning up first. Check the troubleshooting steps below.
- Use
--verboseflag to see detailed installation progress - Check the manual installation steps below if auto-install fails
- Ensure I2C is enabled:
sudo raspi-config→Interface Options→I2C→ Enable
< End of Auto-Installation Guide />
Docker Installation Method
If you like to use this display script but prefer to run it in a container, you first need to make sure you have Docker installed and running, aswell as have I2C enabled correctly:curl -fsSL https://get.docker.com -o get-docker.sh
sudo sh get-docker.sh
sudo usermod -aG docker $USER
rm get-docker.sh
bash # New shell to have the docker command immediatly available to you!
sudo raspi-config nonint do_i2c 0 # Enable i2cTo run the container with the default stats.py script
docker run -d --privileged --network=host --restart=on-failure --name OLED_Stats mklements/oled_statsBut if you like to use a different one like
status.py, you can do it with the below commanddocker run -d --privileged --network=host --restart=on-failure --name OLED_Stats mklements/oled_stats status.pyYou can change
status.py to psutilstats.py or monitor.py.Common Display Issues:
If your display shows jumbled pixels/symbols instead of actual text - you may have a display which supports the SH1106 driver instead of more common SSD1306 driver. This script ONLY works for SSD1306 displays. If you have this issue, follow this guide instead: https://www.youtube.com/watch?v=LdOKXUDw2NYTHE END
Check the logs first
Nine times out of ten the logs tell you exactly what went wrong.
- In Portainer, go to Containers, click the container, then Logs. Or run
docker logs OLED_Stats - Exit codes help too:
137means killed, usually out of memory.126or127means the command inside the image is broken.
Runs on the host network
This container shares your server's network directly, so port mappings are ignored and every port the app opens binds straight to the host.
- If a port won't bind, find the clash with
sudo ss -tlnpand stop the other service, or change the port in OLED_Stats's own settings.
Permission denied on volumes
If the logs show "permission denied", the app can't write to its data folder on the host.
- Fix the ownership:
sudo chown -R 1000:1000 /etc/timezone(and the same for the other mapped folders)
Image won't pull
Test the pull directly on the host: docker pull mklements/oled_stats:latest
- "manifest unknown" means the tag no longer exists. This template uses
latest, so try pinning a specific version instead. - "toomanyrequests" is the Docker Hub rate limit. Log in with
docker loginto raise it. - "no space left on device" means a full disk. Reclaim space with
docker system prune
"exec format error"
This means the image was built for a different CPU architecture than your server.
- This image supports:
amd64, arm64, arm/v7 - Check yours with
uname -m: x86_64 is amd64, aarch64 is arm64. Raspberry Pi and other ARM boards are the usual culprits.
Container keeps restarting
The unless-stopped restart policy relaunches the app after every crash, so the real error can scroll past.
- Check the logs right after a restart, the last few lines before it died are the useful ones.
- Get the exit code with
docker inspect OLED_Stats --format '{{.State.ExitCode}}' - Still stuck? Redeploy once with the restart policy set to
noso the failure stays visible.
Privileged mode
This template runs the container in privileged mode, giving it full access to your host.
- Only deploy it if you trust the app.
- If deployment is blocked, your Portainer security settings or hardened host may not allow privileged containers.
Raise an issue
Found something which isn't working as it should? Here's how to report it.
- Bug within the app: Open an issue on mklements/oled_stats
- Template not working: Open an issue on novaspirit/pi-hosted
- This website not working: Open an issue on lissy93/portainer-templates
A single container
System Stats OLED display runs as one container, the simplest kind of app here. Just the one image to pull and nothing else wired up alongside it.
The app image
An image is the app packed up ready to go, everything System Stats OLED display needs bundled into one download. This template pulls mklements/oled_stats:latest, which Docker fetches once (about 176 MB) and then starts your own copy from.
Where the image comes from
Docker pulls its images from registries, public libraries of ready-built apps. System Stats OLED display's comes from Docker Hub, published by mklements.
Version tags
The bit after the colon in the image name is the version tag. Here it's latest, which always points at the newest build, so a redeploy can bump you to a newer release without you asking. Pin a specific tag if you would rather stay on one version.
Which machines it runs on
Every image is built for particular CPU types. This one ships for amd64, arm64, arm/v7, so it runs on both regular x86 servers and ARM boards like a Raspberry Pi.
Volumes
A volume is where System Stats OLED display keeps its files so they survive an update or a restart. Without one, anything it saves would sit inside the container and vanish the moment it's recreated. This template mounts:
/etc/timezonefrom/etc/timezoneon the host/etc/localtimefrom/etc/localtimeon the host
Environment variables
Environment variables are the settings you hand over when you deploy, things like a password or a timezone. System Stats OLED display takes 2 of them, all with defaults you can leave alone or tweak:
start, defaults to8. Start displaying screenend, defaults to23. End displaying screen
Restart policy
The restart policy here is unless-stopped, so Docker restarts System Stats OLED display after a crash or reboot, but leaves it off when you stop it on purpose. You can change this on the deploy screen. The choices are no (never restart), on-failure (only after a crash), unless-stopped (restart unless you stop it), and always (bring it back no matter what).
Networking
System Stats OLED display runs on the host network, so it shares your server's networking directly instead of getting a private one of its own. Its ports open straight on the server with no mapping in between.
Container name
Once it's deployed, Portainer names the container OLED_Stats. That's what you'll spot in the containers list and use in commands like docker logs OLED_Stats.
Privileged mode
This template runs System Stats OLED display in privileged mode, which gives it nearly as much access to your server as the system itself. Some apps genuinely need it to reach hardware or manage the host, so it's one to run only if you trust the source.
Platform
The platform is linux, the kind of system the container is built to run on. Docker and Portainer handle this on a normal Linux server.
Open source license
System Stats OLED display is open source, released under the MIT license. In plain terms the code is out in the open, so you're free to run it and change it to fit what you need.
Portainer app templates
Zooming out, this whole page comes from a Portainer app template: a short recipe telling Portainer how to set System Stats OLED display up. Add the template list to Portainer once, then deploying System Stats OLED display is a click rather than a wall of config.