
![Wireguard]() Wireguard
Wireguard
Container
WireGuard® is an extremely simple yet fast and modern VPN that utilizes state-of-the-art cryptography. It aims to be faster, simpler, leaner, and more useful than IPsec, while avoiding the massive headache. It intends to be considerably more performant than OpenVPN. WireGuard is designed as a general purpose VPN for running on embedded interfaces and super computers alike, fit for many different circumstances. Initially released for the Linux kernel, it is now cross-platform (Windows, macOS, BSD, iOS, Android) and widely deployable. It is currently under heavy development, but already it might be regarded as the most secure, easiest to use, and simplest VPN solution in the industry.
Image details
Configuration
TypeContainerlinuxlinuxserver/wireguard:latest51820:51820/udp/config : /srv/lsio/wireguard/config/lib/modules : /lib/modulesPUID=1000PGID=1000TZ=Etc/UTCSERVERURL=wireguard.domain.comSERVERPORT=51820PEERS=1PEERDNS=autoINTERNAL_SUBNET=10.13.13.0ALLOWEDIPS=0.0.0.0/0PERSISTENTKEEPALIVE_PEERS=LOG_CONFS=trueunless-stoppedTemplate by technorabilia
Report issueNotes
Ensure to create the following volume directories on the host file system, or modify the paths in the volume mapping section under the advanced options below, as needed.
mkdir -p /srv/lsio/wireguard/config
Standalone Install
Select an install method, to see config/commands for deploying Wireguard
Install on Portainer
Import all app templates into your Portainer instance, for easy 1-click deploys
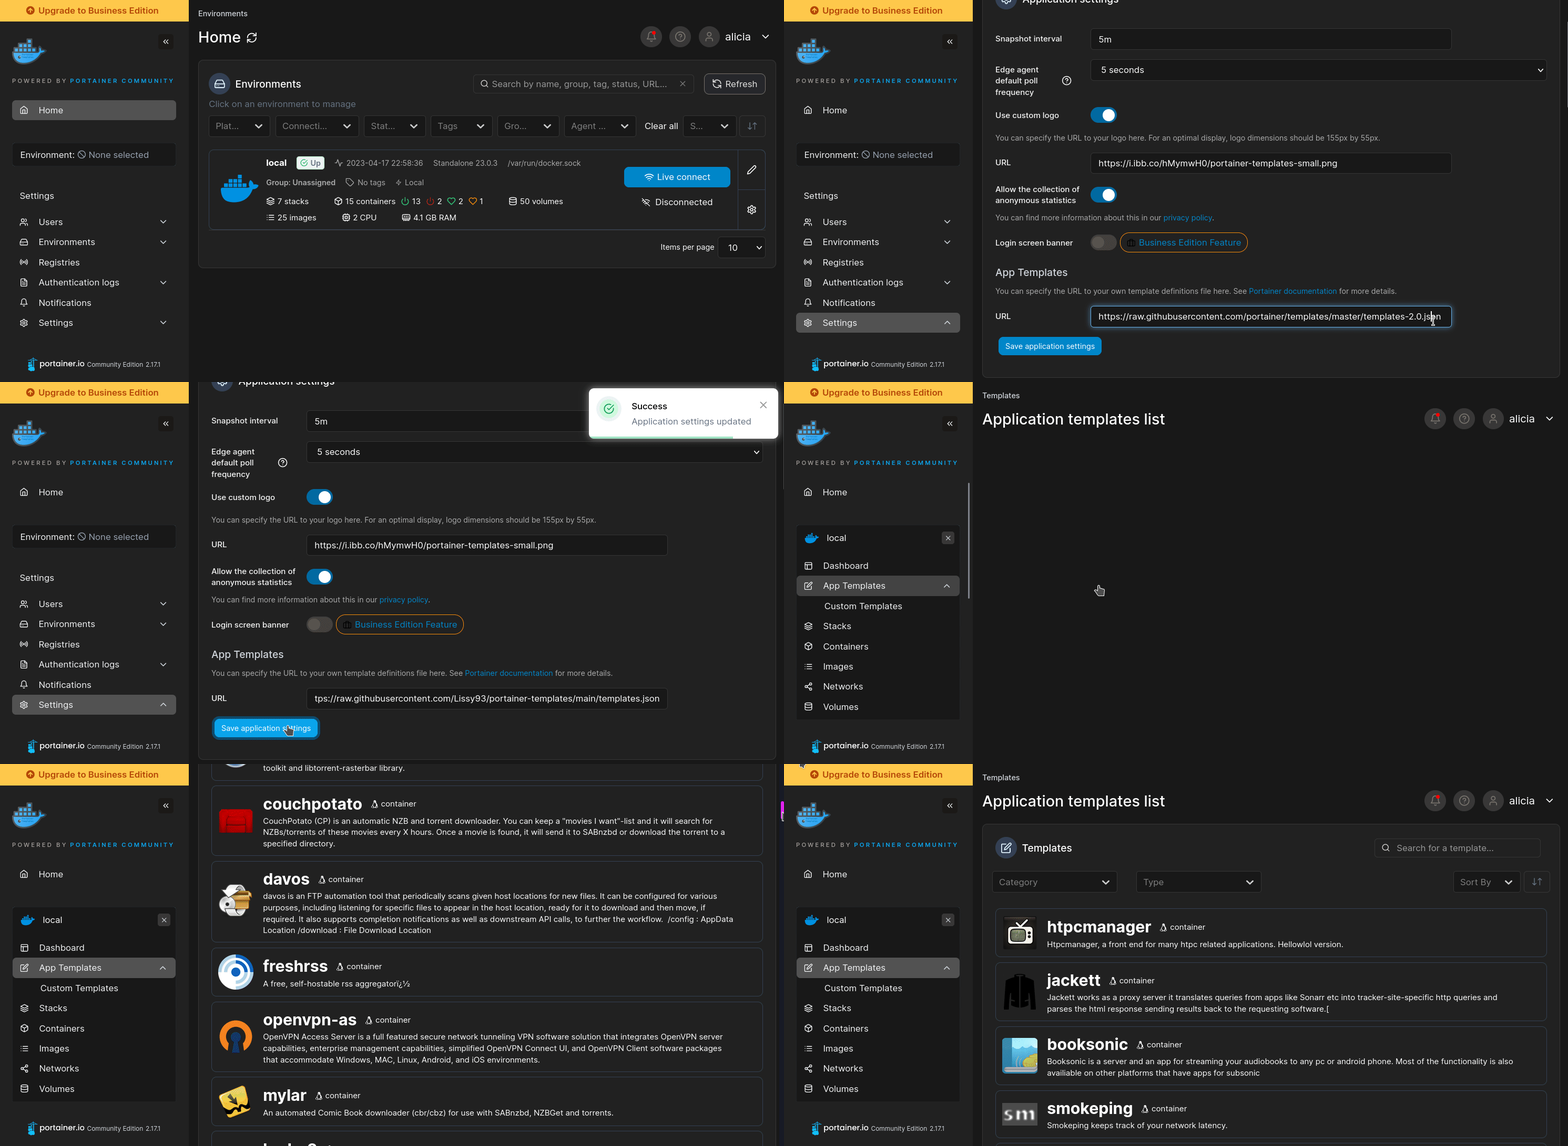
- Ensure both Docker and Portainer are installed, and up-to-date
- Log into your Portainer web UI
- Under Settings → App Templates, paste the below URL
- Head to Home → App Templates, and the list of apps will show up
- Select Wireguard, fill in any config options, and hit Deploy
Template Import URL
https://raw.githubusercontent.com/Lissy93/portainer-templates/main/templates.json
Show Me
More install options in our documentation.
linuxserver/wireguard
This readme has been truncated from the full version found HERE
WireGuard® is an extremely simple yet fast and modern VPN that utilizes state-of-the-art cryptography. It aims to be faster, simpler, leaner, and more useful than IPsec, while avoiding the massive headache. It intends to be considerably more performant than OpenVPN. WireGuard is designed as a general purpose VPN for running on embedded interfaces and super computers alike, fit for many different circumstances. Initially released for the Linux kernel, it is now cross-platform (Windows, macOS, BSD, iOS, Android) and widely deployable. It is currently under heavy development, but already it might be regarded as the most secure, easiest to use, and simplest VPN solution in the industry.Application Setup
During container start, it will first check if the wireguard module is already installed and loaded. All currently supported kernels should have the wireguard module built-in (along with some older custom kernels). However, the module may not be enabled. Make sure it is enabled prior to starting the container.This can be run as a server or a client, based on the parameters used.
Note on iptables
Some hosts may not load the iptables kernel modules by default. In order for the container to be able to load them, you need to assign theSYS_MODULE capability and add the optional /lib/modules volume mount. Alternatively you can modprobe them from the host before starting the container.Server Mode
If the environment variablePEERS is set to a number or a list of strings separated by comma, the container will run in server mode and the necessary server and peer/client confs will be generated. The peer/client config qr codes will be output in the docker log if LOG_CONFS is set to true. They will also be saved in text and png format under /config/peerX in case PEERS is a variable and an integer or /config/peer_X in case a list of names was provided instead of an integer.Variables
SERVERURL, SERVERPORT, INTERNAL_SUBNET, PEERDNS, INTERFACE, ALLOWEDIPS and PERSISTENTKEEPALIVE_PEERS are optional variables used for server mode. Any changes to these environment variables will trigger regeneration of server and peer confs. Peer/client confs will be recreated with existing private/public keys. Delete the peer folders for the keys to be recreated along with the confs.To add more peers/clients later on, you increment the
PEERS environment variable or add more elements to the list and recreate the container.To display the QR codes of active peers again, you can use the following command and list the peer numbers as arguments:
docker exec -it wireguard /app/show-peer 1 4 5 or docker exec -it wireguard /app/show-peer myPC myPhone myTablet (Keep in mind that the QR codes are also stored as PNGs in the config folder).The templates used for server and peer confs are saved under
/config/templates. Advanced users can modify these templates and force conf generation by deleting /config/wg_confs/wg0.conf and restarting the container.The container managed server conf is hardcoded to
wg0.conf. However, the users can add additional tunnel config files with .conf extensions into /config/wg_confs/ and the container will attempt to start them all in alphabetical order. If any one of the tunnels fail, they will all be stopped and the default route will be deleted, requiring user intervention to fix the invalid conf and a container restart.Client Mode
Do not set thePEERS environment variable. Drop your client conf(s) into the config folder as /config/wg_confs/<tunnel name>.conf and start the container. If there are multiple tunnel configs, the container will attempt to start them all in alphabetical order. If any one of the tunnels fail, they will all be stopped and the default route will be deleted, requiring user intervention to fix the invalid conf and a container restart.If you get IPv6 related errors in the log and connection cannot be established, edit the
AllowedIPs line in your peer/client wg0.conf to include only 0.0.0.0/0 and not ::/0; and restart the container.Road warriors, roaming and returning home
If you plan to use Wireguard both remotely and locally, say on your mobile phone, you will need to consider routing. Most firewalls will not route ports forwarded on your WAN interface correctly to the LAN out of the box. This means that when you return home, even though you can see the Wireguard server, the return packets will probably get lost.This is not a Wireguard specific issue and the two generally accepted solutions are NAT reflection (setting your edge router/firewall up in such a way as it translates internal packets correctly) or split horizon DNS (setting your internal DNS to return the private rather than public IP when connecting locally).
Both of these approaches have positives and negatives however their setup is out of scope for this document as everyone's network layout and equipment will be different.
Maintaining local access to attached services
Note: This is not a supported configuration by Linuxserver.io - use at your own risk.When routing via Wireguard from another container using the
service option in docker, you might lose access to the containers webUI locally. To avoid this, exclude the docker subnet from being routed via Wireguard by modifying your wg0.conf like so (modifying the subnets as you require):```ini Interface PrivateKey =
Site-to-site VPN
Note: This is not a supported configuration by Linuxserver.io - use at your own risk.Site-to-site VPN in server mode requires customizing the
AllowedIPs statement for a specific peer in wg0.conf. Since wg0.conf is autogenerated when server vars are changed, it is not recommended to edit it manually.In order to customize the
AllowedIPs statement for a specific peer in wg0.conf, you can set an env var SERVER_ALLOWEDIPS_PEER_<peer name or number> to the additional subnets you'd like to add, comma separated and excluding the peer IP (ie. "192.168.1.0/24,192.168.2.0/24"). Replace <peer name or number> with either the name or number of a peer (whichever is used in the PEERS var).For instance
SERVER_ALLOWEDIPS_PEER_laptop="192.168.1.0/24,192.168.2.0/24" will result in the wg0.conf entry AllowedIPs = 10.13.13.2,192.168.1.0/24,192.168.2.0/24 for the peer named laptop.Keep in mind that this var will only be considered when the confs are regenerated. Adding this var for an existing peer won't force a regeneration. You can delete wg0.conf and restart the container to force regeneration if necessary.
Don't forget to set the necessary POSTUP and POSTDOWN rules in your client's peer conf for lan access.
Usage
docker run -d \
  --name=wireguard \
  --cap-add=NET_ADMIN \
  --cap-add=SYS_MODULE `#optional` \
  -e PUID=1000 \
  -e PGID=1000 \
  -e TZ=Etc/UTC \
  -e SERVERURL=wireguard.domain.com `#optional` \
  -e SERVERPORT=51820 `#optional` \
  -e PEERS=1 `#optional` \
  -e PEERDNS=auto `#optional` \
  -e INTERNAL_SUBNET=10.13.13.0 `#optional` \
  -e ALLOWEDIPS=0.0.0.0/0 `#optional` \
  -e PERSISTENTKEEPALIVE_PEERS= `#optional` \
  -e LOG_CONFS=true `#optional` \
  -p 51820:51820/udp \
  -v /path/to/wireguard/config:/config \
  -v /lib/modules:/lib/modules `#optional` \
  --sysctl="net.ipv4.conf.all.src_valid_mark=1" \
  --restart unless-stopped \
lscr.io/linuxserver/wireguard:latestCheck the logs first
Nine times out of ten the logs tell you exactly what went wrong.
- In Portainer, go to Containers, click the container, then Logs. Or run
docker logs Wireguard - Exit codes help too:
137means killed, usually out of memory.126or127means the command inside the image is broken.
Port already in use
If deployment fails with "Bind for 0.0.0.0:51820 failed: port is already allocated", something else on your server is using that port.
- Find what's using it:
sudo ss -tlnp | grep :51820 - Stop the other service, or pick a different host port. In
51820:51820only the left number is yours to change, the right one belongs to the app.
Permission denied on volumes
If the logs show "permission denied", the app can't write to its data folder on the host.
- Fix the ownership:
sudo chown -R 1000:1000 /srv/lsio/wireguard/config(and the same for the other mapped folders) - Or set the
PUIDandPGIDvariables (defaults 1000:1000) to match your own user, found withid $USER
Image won't pull
Test the pull directly on the host: docker pull linuxserver/wireguard:latest
- "manifest unknown" means the tag no longer exists. This template uses
latest, so try pinning a specific version instead. - "toomanyrequests" is the Docker Hub rate limit. Log in with
docker loginto raise it. - "no space left on device" means a full disk. Reclaim space with
docker system prune
"exec format error"
This means the image was built for a different CPU architecture than your server.
- This image supports:
amd64, arm64 - Check yours with
uname -m: x86_64 is amd64, aarch64 is arm64. Raspberry Pi and other ARM boards are the usual culprits.
Container keeps restarting
The unless-stopped restart policy relaunches the app after every crash, so the real error can scroll past.
- Check the logs right after a restart, the last few lines before it died are the useful ones.
- Get the exit code with
docker inspect Wireguard --format '{{.State.ExitCode}}' - Still stuck? Redeploy once with the restart policy set to
noso the failure stays visible.
Required settings are blank
PERSISTENTKEEPALIVE_PEERS has no default value, and Wireguard may crash or misbehave if left empty.
- Fill it in on the deploy screen before hitting deploy.
Raise an issue
Found something which isn't working as it should? Here's how to report it.
- Bug within the app: Open an issue within Wireguard's repo
- Template not working: Open an issue on technorabilia/portainer-templates
- This website not working: Open an issue on lissy93/portainer-templates
A single container
Wireguard runs as one container, the simplest kind of app here. Just the one image to pull and nothing else wired up alongside it.
The app image
An image is the app packed up ready to go, everything Wireguard needs bundled into one download. This template pulls linuxserver/wireguard:latest, which Docker fetches once (about 39 MB) and then starts your own copy from.
Where the image comes from
Docker pulls its images from registries, public libraries of ready-built apps. Wireguard's comes from Docker Hub, published by linuxserver.
Version tags
The bit after the colon in the image name is the version tag. Here it's latest, which always points at the newest build, so a redeploy can bump you to a newer release without you asking. Newest right now is 1.0.20260223. Pin a specific tag if you would rather stay on one version.
Which machines it runs on
Every image is built for particular CPU types. This one ships for amd64, arm64, so it runs on both regular x86 servers and ARM boards like a Raspberry Pi.
Ports
A port is the door the app answers on. A mapping like 51820:51820 means it's reachable on port 51820 of your server, where the left number is yours to change and the right one belongs to the app. It opens:
51820:51820over UDP
Volumes
A volume is where Wireguard keeps its files so they survive an update or a restart. Without one, anything it saves would sit inside the container and vanish the moment it's recreated. This template mounts:
/configfrom/srv/lsio/wireguard/configon the host/lib/modulesfrom/lib/moduleson the host
Environment variables
Environment variables are the settings you hand over when you deploy, things like a password or a timezone. Wireguard takes 11 of them, and one needs a value before it'll start properly:
PUID, defaults to1000. Run 'id [USER]' for the owner of the host volume directories to get the UID to use here.PGID, defaults to1000. Run 'id [USER]' for the owner of the host volume directories to get the GID to use here.TZ, defaults toEtc/UTC. Specify a timezone to use, see this list.SERVERURL, defaults towireguard.domain.com. External IP or domain name for docker host. Used in server mode. If set to auto, the container will try to determine and set the external IP automatically [OPTIONAL]SERVERPORT, defaults to51820. External port for docker host. Used in server mode. [OPTIONAL]PEERS, defaults to1. Number of peers to create confs for. Required for server mode. Can also be a list of names: myPC,myPhone,myTablet (alphanumeric only) [OPTIONAL]PEERDNS, defaults toauto. DNS server set in peer/client configs (can be set as 8.8.8.8). Used in server mode. Defaults to auto, which uses wireguard docker host's DNS via included CoreDNS forward. [OPTIONAL]INTERNAL_SUBNET, defaults to10.13.13.0. Internal subnet for the wireguard and server and peers (only change if it clashes). Used in server mode. [OPTIONAL]ALLOWEDIPS, defaults to0.0.0.0/0. The IPs/Ranges that the peers will be able to reach using the VPN connection. If not specified the default value is: '0.0.0.0/0, ::0/0' This will cause ALL traffic to route through the VPN, if you want split tunneling, set this to only the IPs you would like to use the tunnel AND the ip of the server's WG ip, such as 10.13.13.1. [OPTIONAL]PERSISTENTKEEPALIVE_PEERS, needs a value. Set to all or a list of comma separated peers (ie. 1,4,laptop) for the wireguard server to send keepalive packets to listed peers every 25 seconds. Useful if server is accessed via domain name and has dynamic IP. Used only in server mode. [OPTIONAL]LOG_CONFS, defaults totrue. Generated QR codes will be displayed in the docker log. Set to false to skip log output. [OPTIONAL]
Restart policy
The restart policy here is unless-stopped, so Docker restarts Wireguard after a crash or reboot, but leaves it off when you stop it on purpose. You can change this on the deploy screen. The choices are no (never restart), on-failure (only after a crash), unless-stopped (restart unless you stop it), and always (bring it back no matter what).
Users and permissions
The PUID and PGID settings tell it which user and group to act as on your host. Point them at your own account (find yours with id $USER) so the files it writes into your mounted folders come out owned by you rather than root.
Networking
Nothing custom is set, so Wireguard sits on Docker's default bridge network: its own private space that reaches the outside world only through the ports it publishes.
Container name
Once it's deployed, Portainer names the container Wireguard. That's what you'll spot in the containers list and use in commands like docker logs Wireguard.
Platform
The platform is linux, the kind of system the container is built to run on. Docker and Portainer handle this on a normal Linux server.
Portainer app templates
Zooming out, this whole page comes from a Portainer app template: a short recipe telling Portainer how to set Wireguard up. Add the template list to Portainer once, then deploying Wireguard is a click rather than a wall of config.