
![TimeTagger]() TimeTagger
TimeTagger
Stack
Open source time-tracker with an interactive user experience and powerful reporting.
Image details
Source details
Configuration
TypeComposelinuxghcr.io/almarklein/timetagger280:80/root/_timetagger : /portainer/Files/AppData/Config/timetaggerTIMETAGGER_BIND=0.0.0.0:80TIMETAGGER_DATADIR=/root/_timetaggerTIMETAGGER_LOG_LEVEL=infoTIMETAGGER_CREDENTIALS=test:$$2a$$08$$0CD1NFiIbancwWsu3se1v.RNR/b7YeZd71yg3cZ/3whGlyU6Iny5iStandalone Install
Select an install method, to see config/commands for deploying TimeTagger
Install on Portainer
Import all app templates into your Portainer instance, for easy 1-click deploys
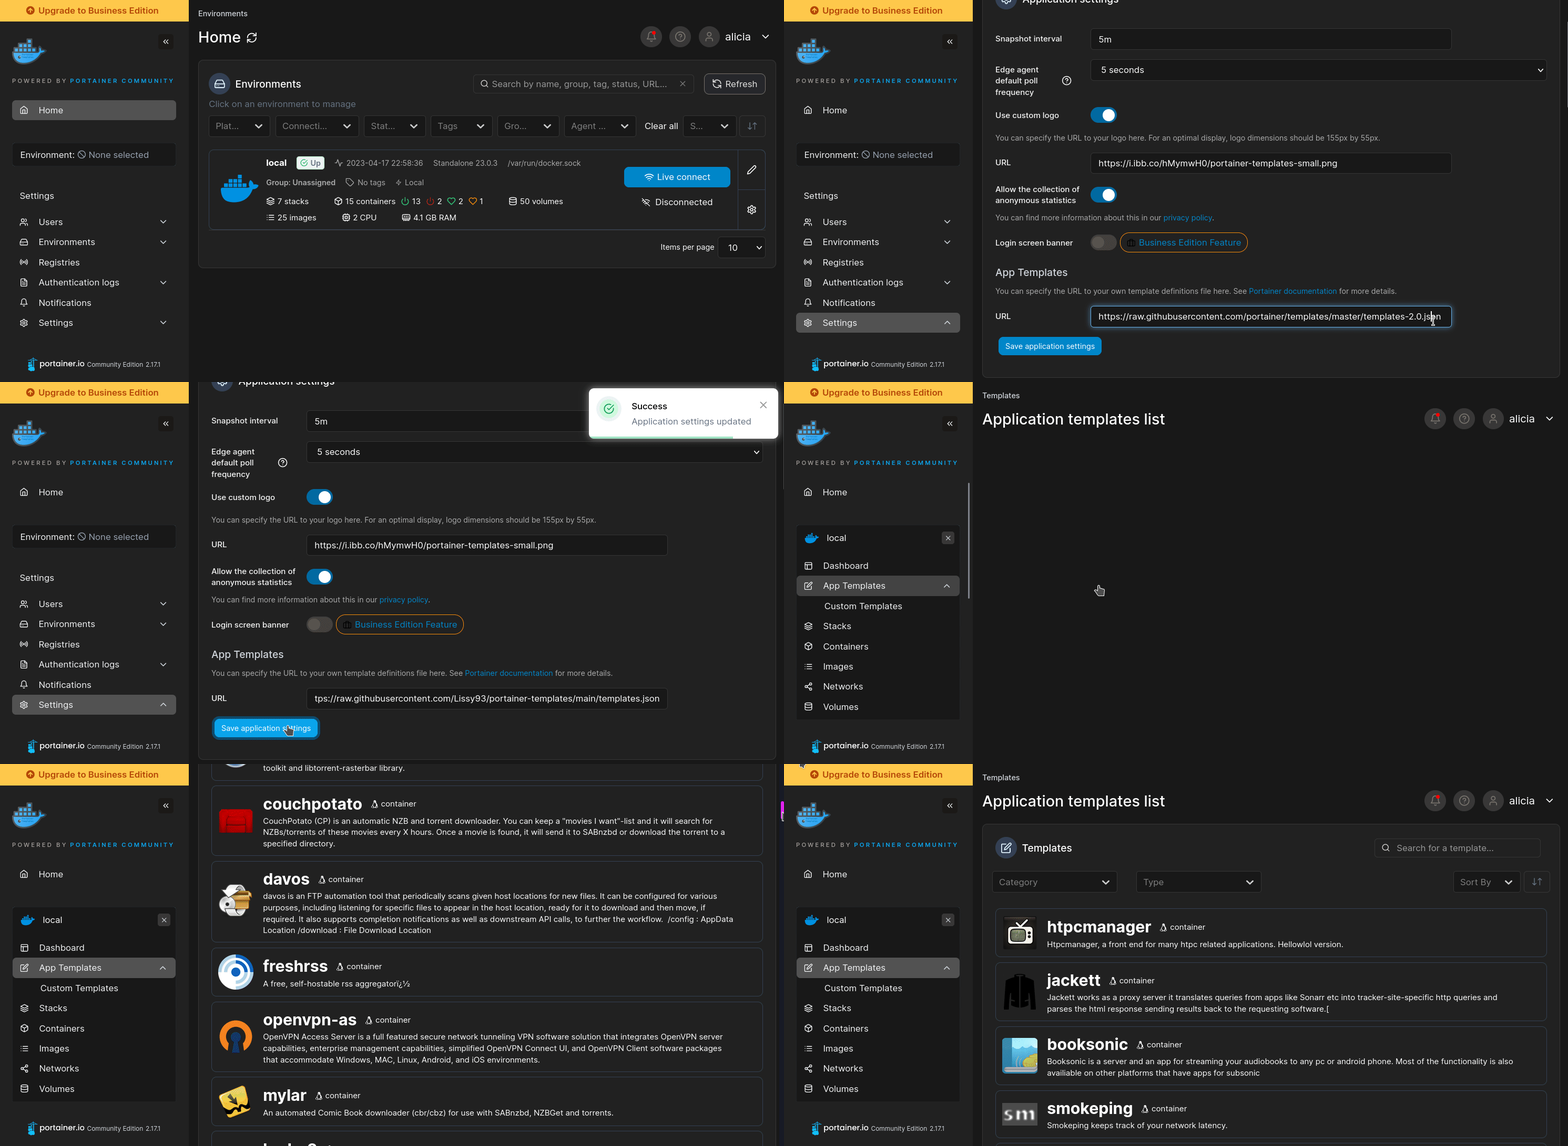
- Ensure both Docker and Portainer are installed, and up-to-date
- Log into your Portainer web UI
- Under Settings → App Templates, paste the below URL
- Head to Home → App Templates, and the list of apps will show up
- Select TimeTagger, fill in any config options, and hit Deploy
Template Import URL
https://raw.githubusercontent.com/Lissy93/portainer-templates/main/templates.json
Show Me
Original stackfile
The compose file this template deploys, straight from its repo:
services:
  timetagger:
    image: ghcr.io/almarklein/timetagger
    ports:
      - "280:80"
    volumes:
      - /portainer/Files/AppData/Config/timetagger:/root/_timetagger
    environment:
      - TIMETAGGER_BIND=0.0.0.0:80
      - TIMETAGGER_DATADIR=/root/_timetagger
      - TIMETAGGER_LOG_LEVEL=info
      - TIMETAGGER_CREDENTIALS=test:$$2a$$08$$0CD1NFiIbancwWsu3se1v.RNR/b7YeZd71yg3cZ/3whGlyU6Iny5i  # test:test
Or deploy it directly from the source:
git clone https://github.com/xneo1/portainer_templates
cd portainer_templates
docker compose -f Template/Stack/timetagger.yml up -d
More install options in our documentation, or see almarklein/timetagger for app-specific guidance.


TimeTagger
Tag your time, get the insight - an open source time-tracker with an interactive user experience and powerful reporting.- Website: https://timetagger.app
- Demo: https://timetagger.app/demo
- Docs: https://timetagger.readthedocs.io
- CLI tool: https://github.com/almarklein/timetaggercli
- TimeTaggerVSCodeExtension (3d party)
Introduction
TimeTagger is a web-based time-tracking solution that can run locally or on a server. It's aimed at individuals and freelancers, and has the following features:- Intuitive UI based around an interactive timeline.
- Lightweight feel by use of tags rather than projects.
- Reporting in PDF and CSV.
- Set daily/weekly/monthly targets.
- Integrated Pomodoro method (experimental).
- Responsive: works well on small and large screens.
- Sync between devices.
Under the hood
The server runs on async Python using uvicorn and asgineer - which is fun and bloody fast. It uses SQLite via itemdb to store the data, making it easy to deploy.The client is a mix of HTML, CSS, Markdown, and ... Python! PScript is used to compile the Python to JavaScript. This may be a bit idiosyncratic, but it's fun! Maybe I'll someday implement it in something that compiles down to Wasm :)
Install and run
TimeTagger is implemented as a Python library that requires Python 3.6 or higher. The dependencies are listed inrequirements.txt - these are installed automatically when you install TimeTagger with Pip.# Install
pip install -U timetagger
# Run
python -m timetaggerIf the server runs on your local machine, you can use single-user mode out-of-the-box.
Self-hosting your time tracker
Docker images are provided via the Github container registry, so you can use e.g. Docker-compose to easily host your own server.There are two variants, one that runs the server as root inside the container and a nonroot variant that runs as user 1000:
See this article for more information about self hosting.
Authentication using credentials
If you want multiple users, or if the server is not on localhost, you may want to provide the server with user credentials using an environment variable or a command line arg (see the docs on config).# Using command-line args
python -m timetagger --credentials=test:$2a$08$0CD1NFiIbancwWsu3se1v.RNR/b7YeZd71yg3cZ/3whGlyU6Iny5i
# Using environment variables
export TIMETAGGER_CREDENTIALS='test:$2a$08$0CD1NFiIbancwWsu3se1v.RNR/b7YeZd71yg3cZ/3whGlyU6Iny5i'
python -m timetaggerThe credentials take the form "
Authentication using a reverse proxy
If you have a reverse proxy which already authenticates users (e.g. Authelia) and provides the username through a HTTP header, you can tell TimeTagger to use this information. To configure it there are three environment variables and command line arguments (see the docs on config).# Using command-line args
python -m timetagger --proxy_auth_enabled=True --proxy_auth_trusted=127.0.0.1 --proxy_auth_header=X-Remote-User
# Using environment variables
export TIMETAGGER_PROXY_AUTH_ENABLED=True TIMETAGGER_PROXY_AUTH_TRUSTED=127.0.0.1 TIMETAGGER_PROXY_AUTH_HEADER=X-Remote-User
python -m timetaggerShow your support
If you're self-hosting TimeTagger and want to support the project, you can:- Write something about TimeTagger in a blog post or social media (and link to
https://timetagger.app). This helps search engines find it better. - Contribute improvements via Github.
- For financial support you can take a subscription or donate (see the donation links on the side).
Using the hosted version
You can also make use of https://timetagger.app so you don't have to worry about maintaining a server, backups, and all that. An account is just €3 per month. With that you'd also sponsor this project and open source in general.Copyright and license
As usual, copyright applies to whomever made a particular contribution in this repository, which can be inspected via e.g. git blame. The owner of the copyright (i.e. the author) is free to use their code in any way.This code is also subject to the GPL-3.0 License, to protect it from being used commercially by other parties.
Contributors must agree to the Contributor License Agreement to grant me (Almar) the right to use their contributions at e.g. the TimeTagger.app service. By making a contribution to this project, you agree to this CLA.
Developers
Clone the repo and install in development mode:git clone https://github.com/almarklein/timetagger.git
cd timetagger
pip install -e .Install additional developer dependencies:
pip install invoke black flake8 pytest pytest-cov requestsThen these commands can be used during development:
invoke -lto see available invoke tasksinvoke cleanto remove temporary filesinvoke formatto autoformat the code (using black)invoke lintto detect linting errors (using flake8)invoke teststo run tests (using pytest)
Serve TimeTagger on your own domain behind Caddy, Nginx or Traefik. Fill in your domain and copy the result. It's a starting point, some apps need their own base URL or extra headers set too.
Proxying timetagger.example.com to http://timetagger:80
Add this to your Caddyfile
timetagger.example.com {
	reverse_proxy http://timetagger:80
}Check the logs first
Nine times out of ten the logs tell you exactly what went wrong.
- In Portainer, go to Containers, click the container, then Logs. Or run
docker logs <container> - Exit codes help too:
137means killed, usually out of memory.126or127means the command inside the image is broken.
Port already in use
If deployment fails with "Bind for 0.0.0.0:280 failed: port is already allocated", something else on your server is using that port.
- Find what's using it:
sudo ss -tlnp | grep :280 - Stop the other service, or pick a different host port. In
280:80only the left number is yours to change, the right one belongs to the app.
Running but the page won't load
The container is up but nothing appears in your browser.
- Use your server's real IP:
http://your-server-ip:280. The 0.0.0.0 link Portainer shows isn't a real address. - Give it a minute after first deploy, timetagger can take a while to initialise.
- Make sure your firewall allows the port, e.g.
sudo ufw allow 280
Permission denied on volumes
If the logs show "permission denied", the app can't write to its data folder on the host.
- Fix the ownership:
sudo chown -R 1000:1000 /portainer/Files/AppData/Config/timetagger
Image won't pull
Test the pull directly on the host: docker pull ghcr.io/almarklein/timetagger
- "manifest unknown" means the tag no longer exists. This template uses
latest, so try pinning a specific version instead. - "toomanyrequests" is the Docker Hub rate limit. Log in with
docker loginto raise it. - "no space left on device" means a full disk. Reclaim space with
docker system prune
"exec format error"
This means the image was built for a different CPU architecture than your server.
- This image supports:
amd64, arm64 - Check yours with
uname -m: x86_64 is amd64, aarch64 is arm64. Raspberry Pi and other ARM boards are the usual culprits.
Stack won't deploy
Compose stacks fail fast on small mistakes, and Portainer shows the reason just above the editor.
- YAML only accepts spaces for indentation, a single tab breaks the whole file.
Raise an issue
Found something which isn't working as it should? Here's how to report it.
- Bug within the app: Open an issue on almarklein/timetagger
- Template not working: Open an issue on xneo1/portainer_templates
- This website not working: Open an issue on lissy93/portainer-templates
A Compose stack
TimeTagger is a Compose stack, a set of containers defined in one file and brought up together by Portainer, then started and stopped as a single app.
The app image
An image is the app packed up ready to go, everything TimeTagger needs bundled into one download. This template pulls ghcr.io/almarklein/timetagger, which Docker fetches once (about 61 MB) and then starts your own copy from.
Where the image comes from
Docker pulls its images from registries, public libraries of ready-built apps. TimeTagger's comes from the GitHub Container Registry, published by almarklein.
Version tags
The bit after the colon in the image name is the version tag. Here it's latest, which always points at the newest build, so a redeploy can bump you to a newer release without you asking. Pin a specific tag if you would rather stay on one version.
Which machines it runs on
Every image is built for particular CPU types. This one ships for amd64, arm64, so it runs on both regular x86 servers and ARM boards like a Raspberry Pi.
Ports
A port is the door the app answers on. A mapping like 280:80 means it's reachable on port 280 of your server, where the left number is yours to change and the right one belongs to the app. Once it's running, open http://your-server-ip:280 in a browser. It opens:
280:80, likely the web interface
Volumes
A volume is where TimeTagger keeps its files so they survive an update or a restart. Without one, anything it saves would sit inside the container and vanish the moment it's recreated. This template mounts:
/root/_timetaggerfrom/portainer/Files/AppData/Config/timetaggeron the host
Environment variables
Environment variables are the settings you hand over when you deploy, things like a password or a timezone. TimeTagger takes 4 of them, all with defaults you can leave alone or tweak:
TIMETAGGER_BIND, defaults to0.0.0.0:80TIMETAGGER_DATADIR, defaults to/root/_timetaggerTIMETAGGER_LOG_LEVEL, defaults toinfoTIMETAGGER_CREDENTIALS, defaults totest:$$2a$$08$$0CD1NFiIbancwWsu3se1v.RNR/b7YeZd71yg3cZ/3whGlyU6Iny5i
Networking
Nothing custom is set, so TimeTagger sits on Docker's default bridge network: its own private space that reaches the outside world only through the ports it publishes.
Container name
Once it's deployed, Portainer names the container timetagger. That's what you'll spot in the containers list and use in commands like docker logs timetagger.
Platform
The platform is linux, the kind of system the container is built to run on. Docker and Portainer handle this on a normal Linux server.
Open source license
TimeTagger is open source, released under the GPL-3.0 license. In plain terms the code is out in the open, so you're free to run it and change it to fit what you need.
Portainer app templates
Zooming out, this whole page comes from a Portainer app template: a short recipe telling Portainer how to set TimeTagger up. Add the template list to Portainer once, then deploying TimeTagger is a click rather than a wall of config.